Permissions
You will require an Access Role with the following permissions:
- Tailoring
- User Defined Fields
User defined fields can be configured when there is a requirement to store additional information unique to your organisation, which the system does not store by default. You can add a new field to the database which can then be applied to many areas of the system.
- Add single fields and control the order they appear in.
- Add several fields, assign them to a group of fields and control the order that they appear in.
- Navigate from the Home page to Administrative Settings | Tailoring | User Defined Fields.

- From the Page Options menu, click Add User Defined Field.

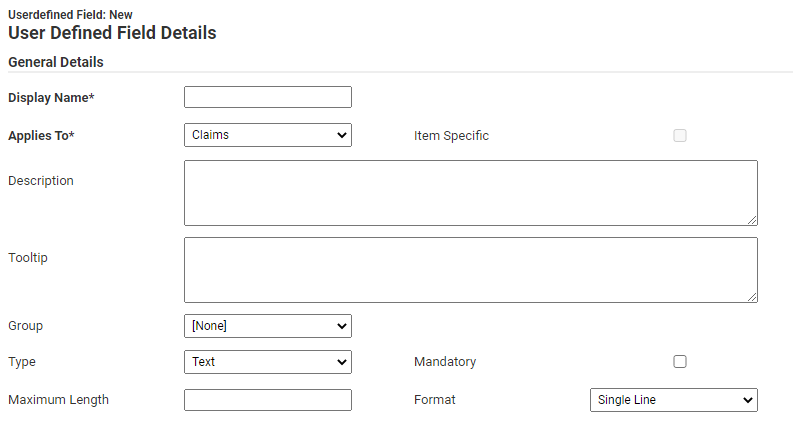
- Complete the General Details:
General Details Description Display Name* Enter a name so that you can easily identify the field. Applies To* From the drop-down list, select an area of Assure Expenses the user defined field applies to.
The list of available areas a user defined field can be added to are:- Claims
- Cost Codes
- Departments
- Employees
- Expense Item Categories
- Expense Items
- Project Code
- Vehicles
Item Specific Select the check box to specify if the field is 'Item Specific'. This option is only applicable when 'Expense Items' has been selected in the 'Applies To' field.
Note: Once selected, you will need to enable the user defined field on each individual expense item within the 'Additional Fields' tab.Description Enter a description so that the purpose of the field can be easily identified. Tooltip Enter a tooltip to provide the user with guidance on the purpose of the field. Group Select the group that this field will belong to. If you intend for this to be a single field, the value should be left as [None].
Note: An applicable group will need to be created prior to creating this user defined field.
Note: Grouping is unavailable for 'Claims' and 'Expense Items'.Type From the drop-down list, select the type of field. This will help ensure that the information is collected efficiently and in the correct format. Depending on your selection, additional fields may appear. The following table lists all available field types and their corresponding options. - Select a field type and complete any additional fields that are required:
Field Type Description Text Allows a user to enter text into the field. - Specify the 'Maximum Length' of the field (number of characters).
- Specify whether the format of the field will be 'Single Line' or 'Multiple Line'.
- Select the 'Encrypt Data' check box to encrypt the data stored when saving the attribute. This will add an extra layer of security to protect any personal or sensitive information.
Integer Allows a user to enter a number into the field. Decimal Allows a user to enter a decimal number into the field. - Use the 'Precision' field to specify the number of decimal places after the decimal point. Up to nine decimal places are permitted.
Currency Allows a user to enter a monetary value, up to two decimal places. Yes/No Allows a user to select 'Yes' or 'No' from a drop-down list. - Specify whether the default value should display as 'Yes' or 'No'.
List Allows a user to select information from a drop-down list. You must specify the values to show within the list. - Use
 to add an individual item which will be populated within the drop-down list.
 - Click a list item and then click
 to remove that item from the list.
 - If you need to keep the list item, but it is no longer required, click
 and set the field to 'Archived'.
Date Allows a user to define a date. - Specify if the field should be 'Date Only', 'Time Only' or 'Date & Time'.
Large Text Allows the user to enter a large amount of text. - Specify the 'Maximum Length' of the field (number of characters).
- Specify whether the format of the field will be 'Multiple Line' or 'Formatted Text Box'.
- Select the 'Encrypt Data' check box to encrypt the data stored when saving the attribute. This will add an extra layer of security to protect any personal or sensitive information.
Hyperlink Store the address of an existing web page or URL link to a document. - Enter the text that the hyperlink should be displayed as.
- Enter the URL address of an existing web page or URL link to a document.
Relationship Create a lookup field to another area of the system from a pre-existing defined list. - Select a 'Related Table' and a 'Display Field'.
- Use the
 to add 'Match Fields'.
 - Enter the maximum number of 'Suggestions' that will display when the user searches.
Note: For text fields, once the maximum character length has been set it cannot be changed.
- Specify the 'Maximum Length' of the field (number of characters).
- Determine if the user defined field need to be mandatory for the user to complete. If so, select the 'Mandatory' checkbox.
- Click Save to create your user defined field.
Note: If you are creating several user defined fields in a single area, for instance on an employee record, you can set the order in which the fields should appear. Navigate from the Home page to Administrative Settings | Tailoring | User Defined Field Ordering.


 to add an individual item which will be populated within the drop-down list.
 to remove that item from the list.
 and set the field to 'Archived'.