Permissions
You will require the following permissions:
- The relevant item role that allows you to claim expenses
This is the juicy part of Selenity Expenses Mobile! This guide explains how to add an expense to your claim so that you can see your money again!
Setting Up
If your expense has a receipt, tap the Navigation Menu  and then tap Receipt Wallet. Tap the receipt that you want to add an expense from. You will be taken to the next step of the process. To follow along, click the 'Choosing an Expense Category' tab at the top of this article.
Note: For help on adding a new receipt image, visit Mobile - Add a Receipt to Receipt Wallet.

If your expense doesn't have a receipt, tap the Navigation Menu  and then tap Current Claims. Tap
  and then tap Add Expense Without a Receipt
  . You will be taken to the next step of the process. To follow along, click the 'Choosing an Expense Category' tab at the top of this article.
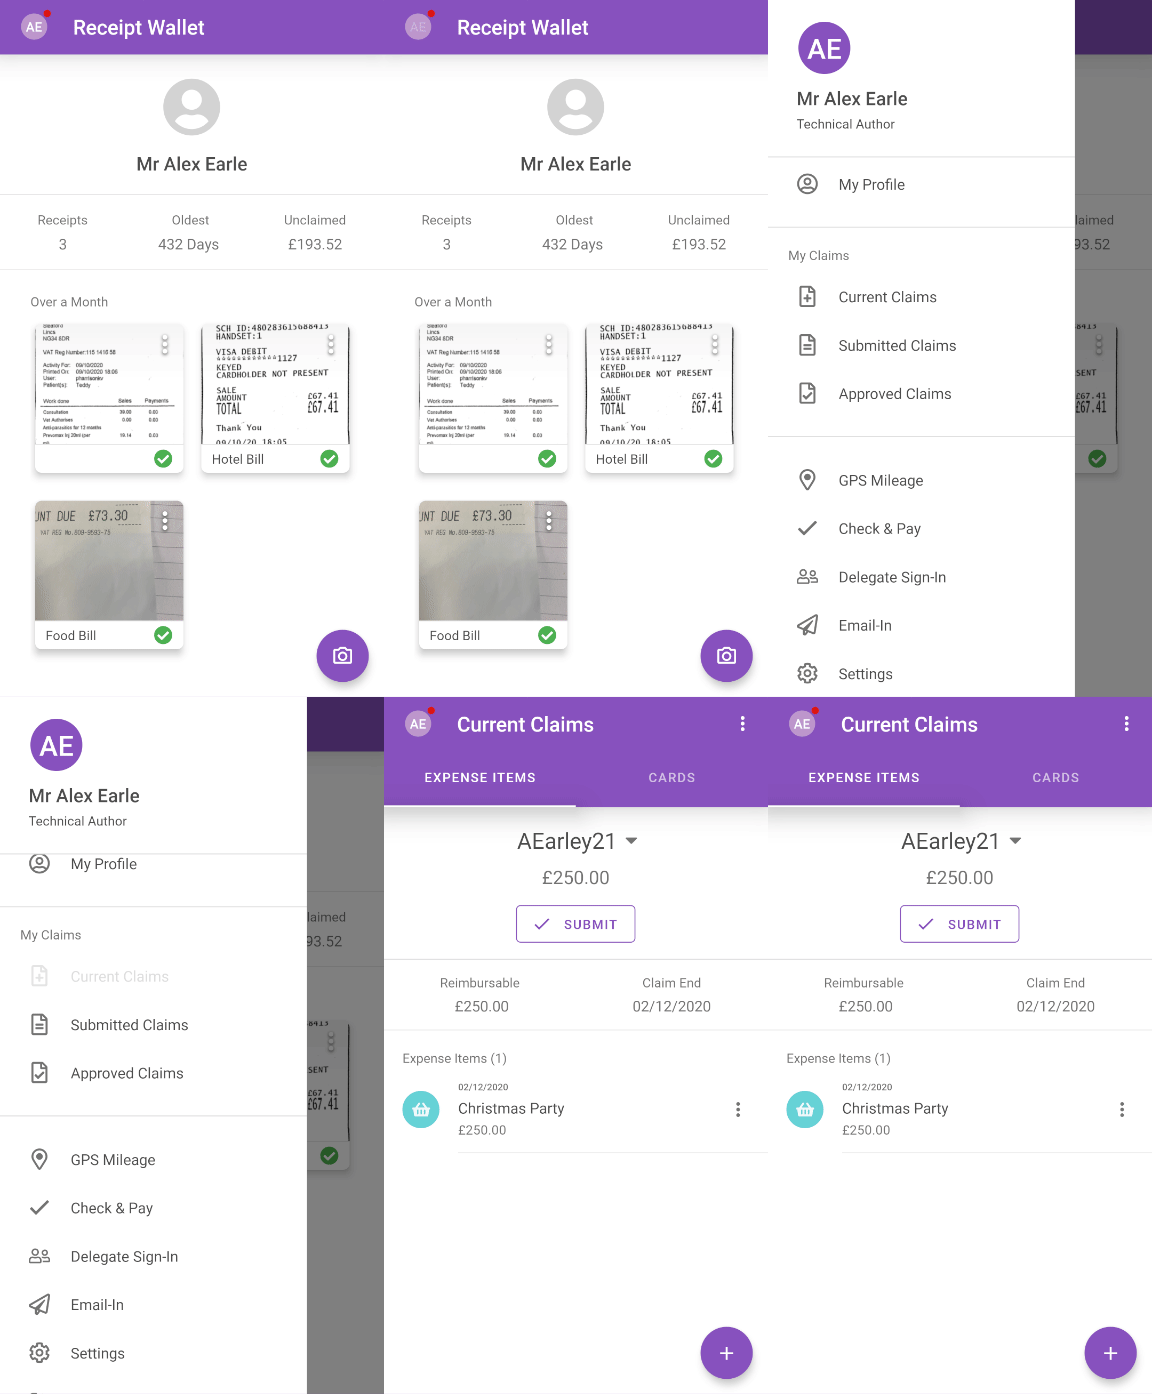

Note: Tapping Add Expense  within Current Claims will redirect you to the Receipt Wallet.
Choosing an Expense Type
If your expense doesn't have a receipt, you will be required to select the expense date. This will automatically be populated if you selected a receipt from your Receipt Wallet.

Note: You are able to change the date by tapping
 . Some expense items will not be available on certain dates; this is configured by your organisation.
 A list of the expenses you can claim against will be shown in a categorised list. You can search by tapping the search bar and entering the name of the expense.
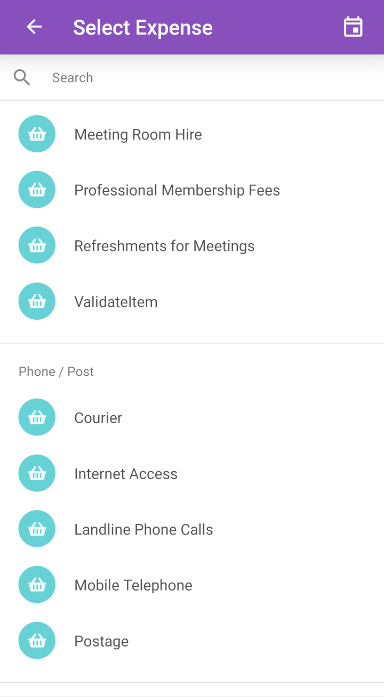
Tap the expense item you want to claim for. You will be directed to the 'Add Expense' form. To follow along, click the 'Adding Your Expense Information' tab at the top of this article.
Adding Your Expense Information
The 'Add Expense' page is split into sections that you are required to fill out. This example will use a Standard Item.

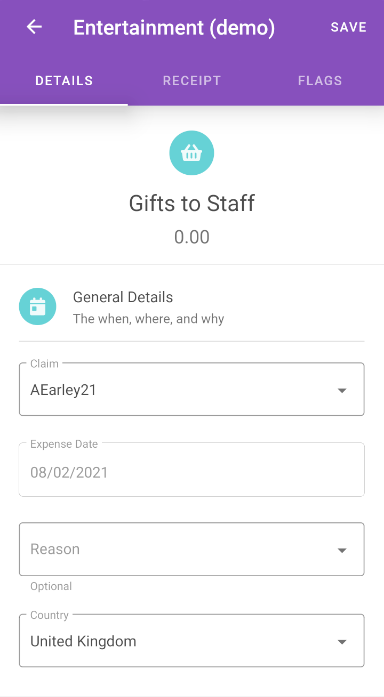
- Complete the 'General Details' section (every expense type will include this section):
Field Description Date This will be disabled. If you want to change it, you must go back to the 'Select Expense' page and tap
 .
.Claim This field will be disabled if you only have one current claim. It will default to your most recent claim or the claim that you have navigated through to get to the 'Add Expense' page. Tap the 'Claim' field to select a different claim if applicable.
Company Select the company related to this expense. For example, if you are adding a parking ticket expense for visiting a customer, enter the name of the company that you visited.
Tap on the 'Company' field and then use the search bar to find the company that you want to add. If the company is not available, you can add it manually by tapping Add Company.Reason Select the reason for incurring the expense.
Country Select the country that the expense was incurred in. This will default to the 'Primary Country' set within your employee record.
Other Details Provide any other important details about the expense. If you set a description on a receipt in your Receipt Wallet, it will appear in this field.
- The next section of the add expense form will include fields specific to the type of expense you are claiming for. The name of this section and which fields are displayed will vary, but we have explained it all thoroughly in the 'Other Types of Expense' tab at the top of this article. The fields listed in the table below are for a 'Standard Item' expense type.
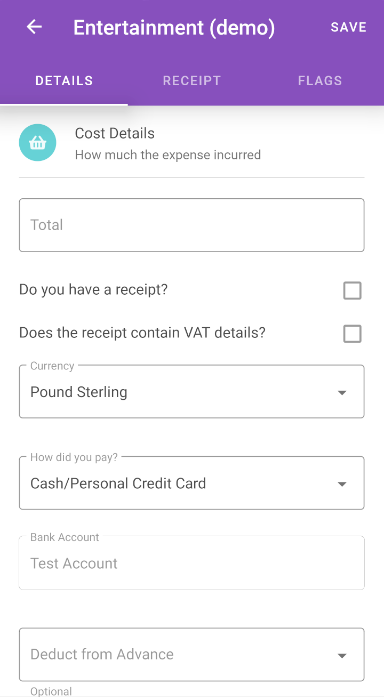
Field Description Total (Gross) Enter the total cost of the expense.
Note: Receipt Scan should have prepopulated this field if you added your expense from a receipt in your Receipt Wallet.
Note: Ensure that this figure is inclusive of the tip, if applicable.Currency Select the currency that your expense was incurred in.
This will default to the 'Primary Currency' set within your employee record. If there is no 'Primary Currency' set, the currency will default to the 'Base Currency' of your organisation.
If you select another currency, the 'Exchange Rate' field will be displayed. Your system configuration will determine whether you can edit this exchange rate.Note: This will automatically be selected if you added your expense from a receipt in your Receipt Wallet. If OCR was unable to find the currency, it will default to the 'Primary Currency' set within your employee record. If there is no 'Primary Currency' set, the currency will default to the 'Base Currency' of your organisation.
Do you have a receipt?
Select this check box if you have a receipt for this expense.
Note: This will automatically be selected if you added your expense from a receipt in your Receipt Wallet.
Does it include a VAT number and VAT rate?
Select whether the receipt includes a valid VAT Number and VAT Rate.
Note: If the receipt scan picks up a VAT value then this option will be automatically selected.Deduct from Advance
If available, select the advance which was used for the purchase.
Note: This will only show advances where the advance currency matches the currency selected for the expense. It can only be used when 'Cash/Personal Credit Card' is selected as the payment method.Bank Account Tap the 'Bank Account' field which will direct you to the 'Select Account' page. Select the appropriate bank account from your existing accounts. When submitted, the approver will not be able to see details of your selected bank account.
Payment Method Select the method used to pay for the expense. You will only be able to select payment methods which are configured within your employee record.
- Some additional sections may need completing in order for you to save your expense item. This could include the 'ESR Assignment Details' section for NHS workers or the 'Final Bits' section if your company has set up some extra fields which they need you to complete. If displayed, the 'Costing Breakdown' section will allow you to split an expense across different cost codes, project codes and departments. For more information on how to use the Costing Breakdown, view Costing Breakdown.
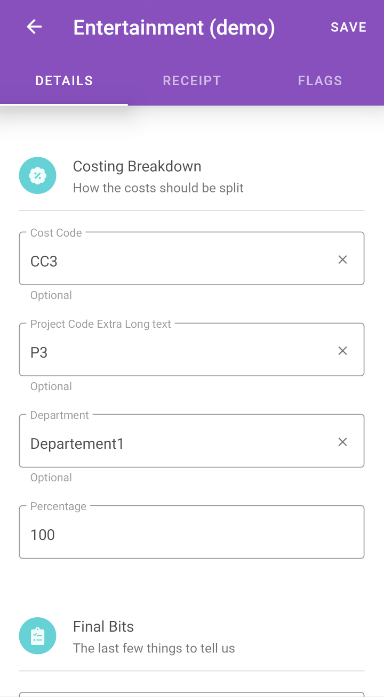
- Tap SAVE when you are happy that the details are accurate.
- If any of your expense items have breached policy, they may have been flagged. Flagged expense items will be displayed with a badge
 . For information on how to view the flags against an expense item and provide justifications, view View Flag Information on an Expense.
 - If any of your expense items are blocked for breaching policy, you will be unable to save your expense.
- If any of your expense items have breached policy, they may have been flagged. Flagged expense items will be displayed with a badge
Other Types of Expense
Each of the expense types below are set up differently. Click on each one to see which fields need completing to add your expense.
Mileage

Configuring the Mileage Expense
- From within the 'Journey Details' section, select the vehicle which was used for this journey. The 'Vehicle' field will automatically populate with your most recently used vehicle. To add a new vehicle, visit Manage My Vehicles.
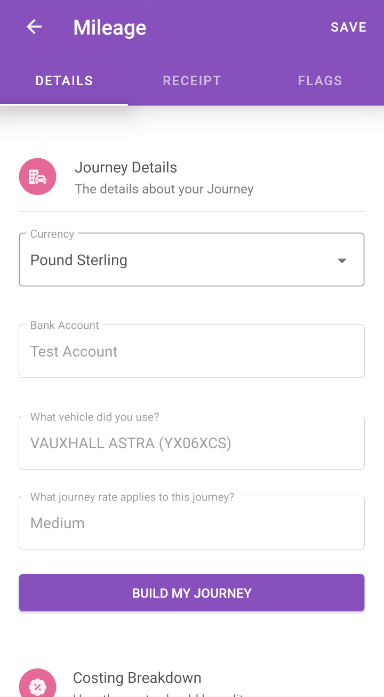
- Select the vehicle journey rate for the vehicle you have specified. This will determine the rate of reimbursement for the mileage. In some cases, a default vehicle journey rate may be enforced by your organisation.
- Tap Build My Journey.
Creating the Journey
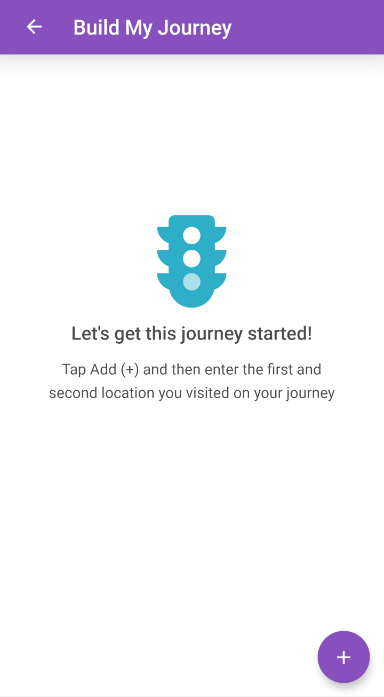
- Tap
 and then enter the details for the starting location.
- Three tabs will be displayed:
Location Within the search bar, enter a location using a post code or address details. A list of relevant addresses will be shown.
Locations will be displayed with a nickname if set. To set a nickname, tap the menu next to the location and then tap Set Nickname. Tap
  to favourite a location and tap
  to unfavourite a location. Account wide favourites will be shown with a
  and cannot be unfavourited. Favourites can be viewed in the 'Favourites' tab.
If set, you can tap the Home or Office shortcut buttons to quickly populate your home or primary work address.
If you are unable to find the location you are looking for, you may be permitted to add a manual address. If displayed, tap Add Location and you will be directed to a form where you can enter the address details. Tap SAVE to store the address for future use.Favourites This will display a list of all your favourited locations.
Tap to favourite a location and tap
  to unfavourite a location.
Countries This will display a list of available countries. Select a country and you can then search for addresses within that country. 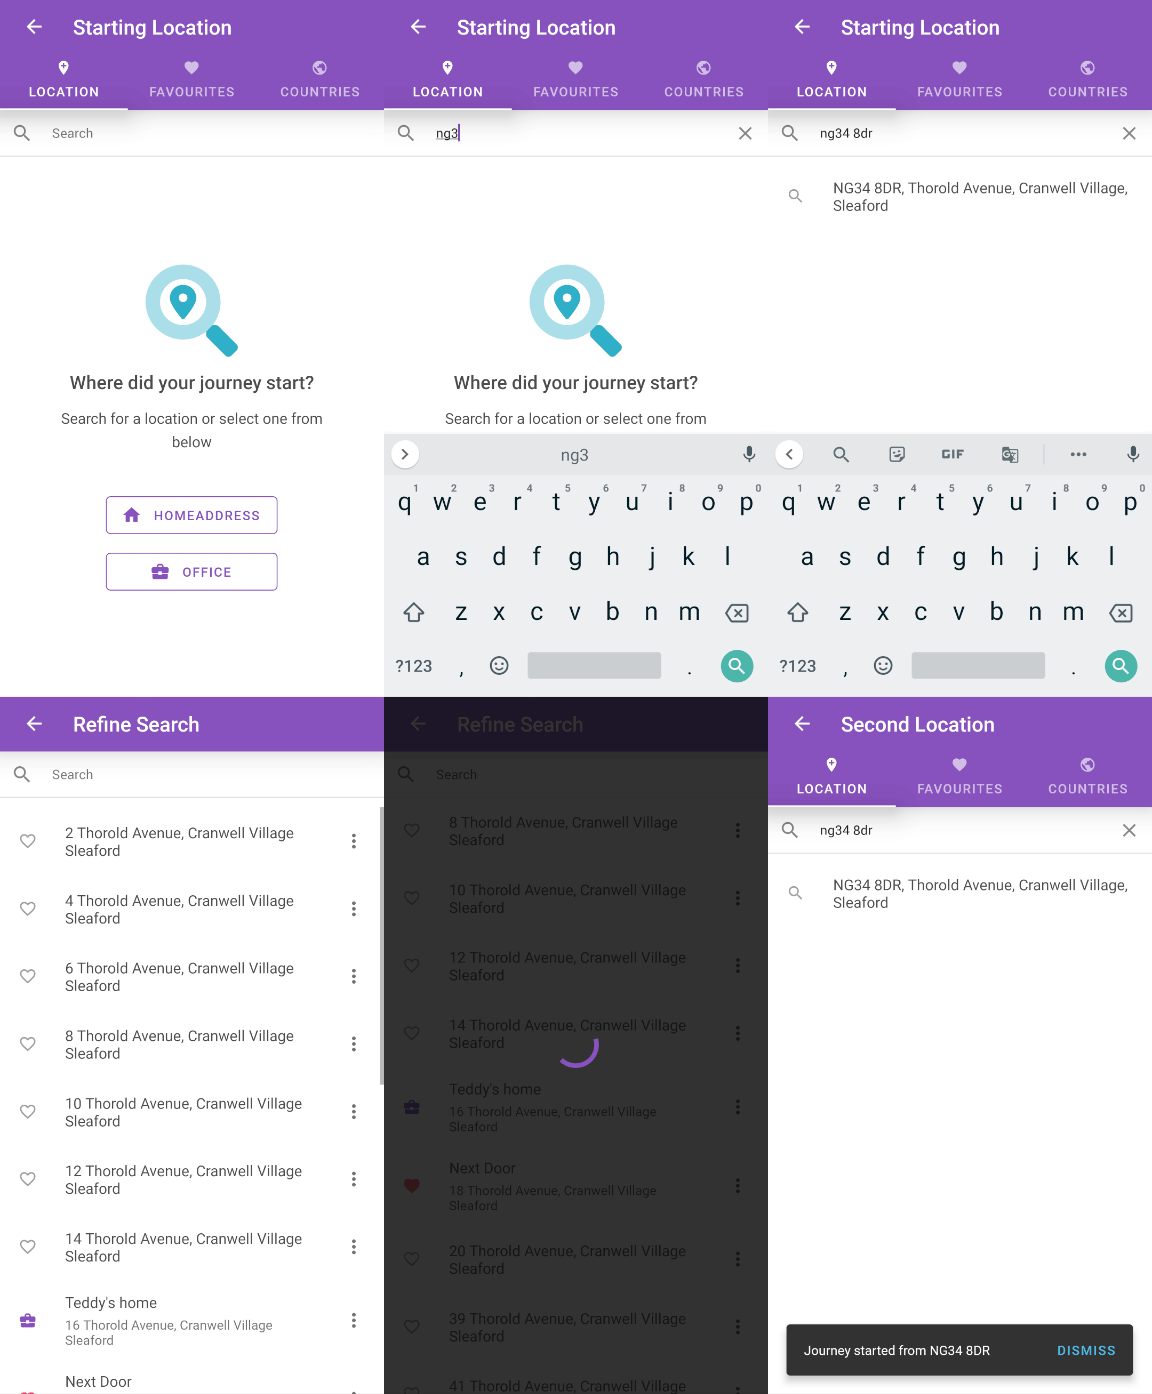
- Now that you have selected the starting location, select the next location that you visited on your journey.
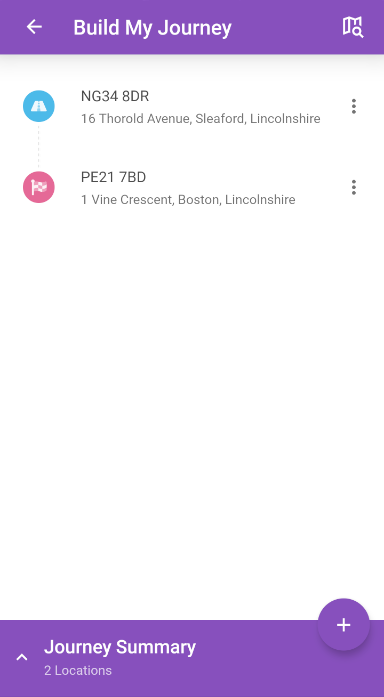
- Once you have selected both locations, you will be shown an overview of your journey so far.
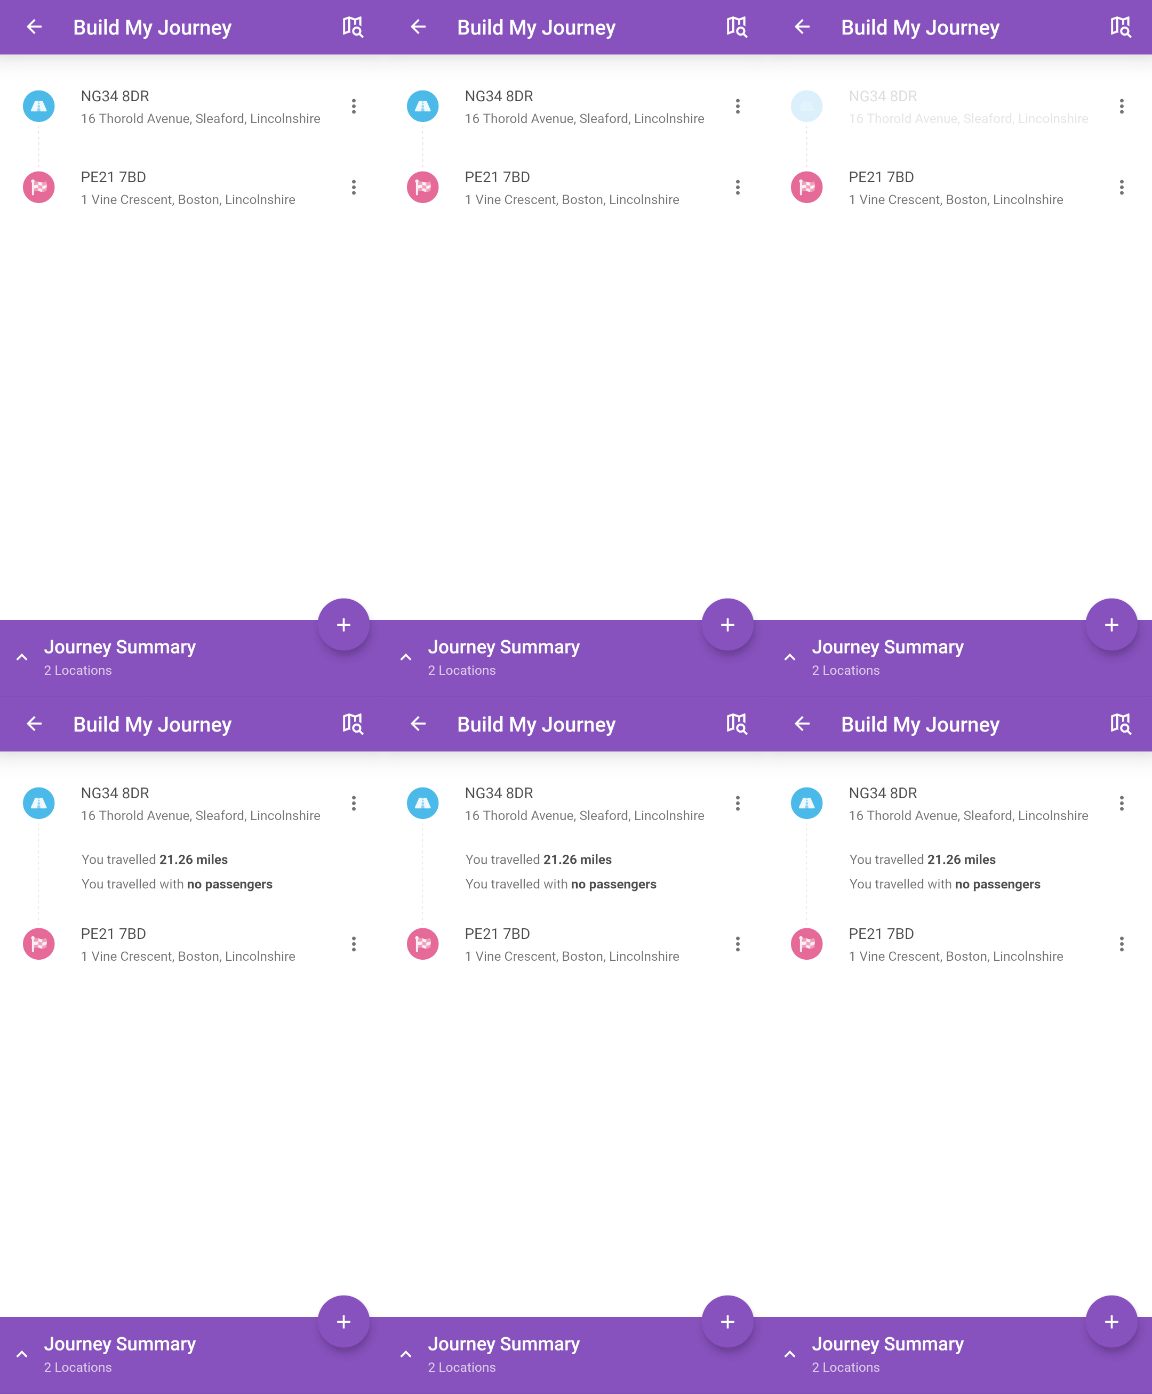
- Tap the address to see extra information about your journey, such as the recommended distance. It might include the number of passengers and whether you travelled with heavy/bulky equipment.
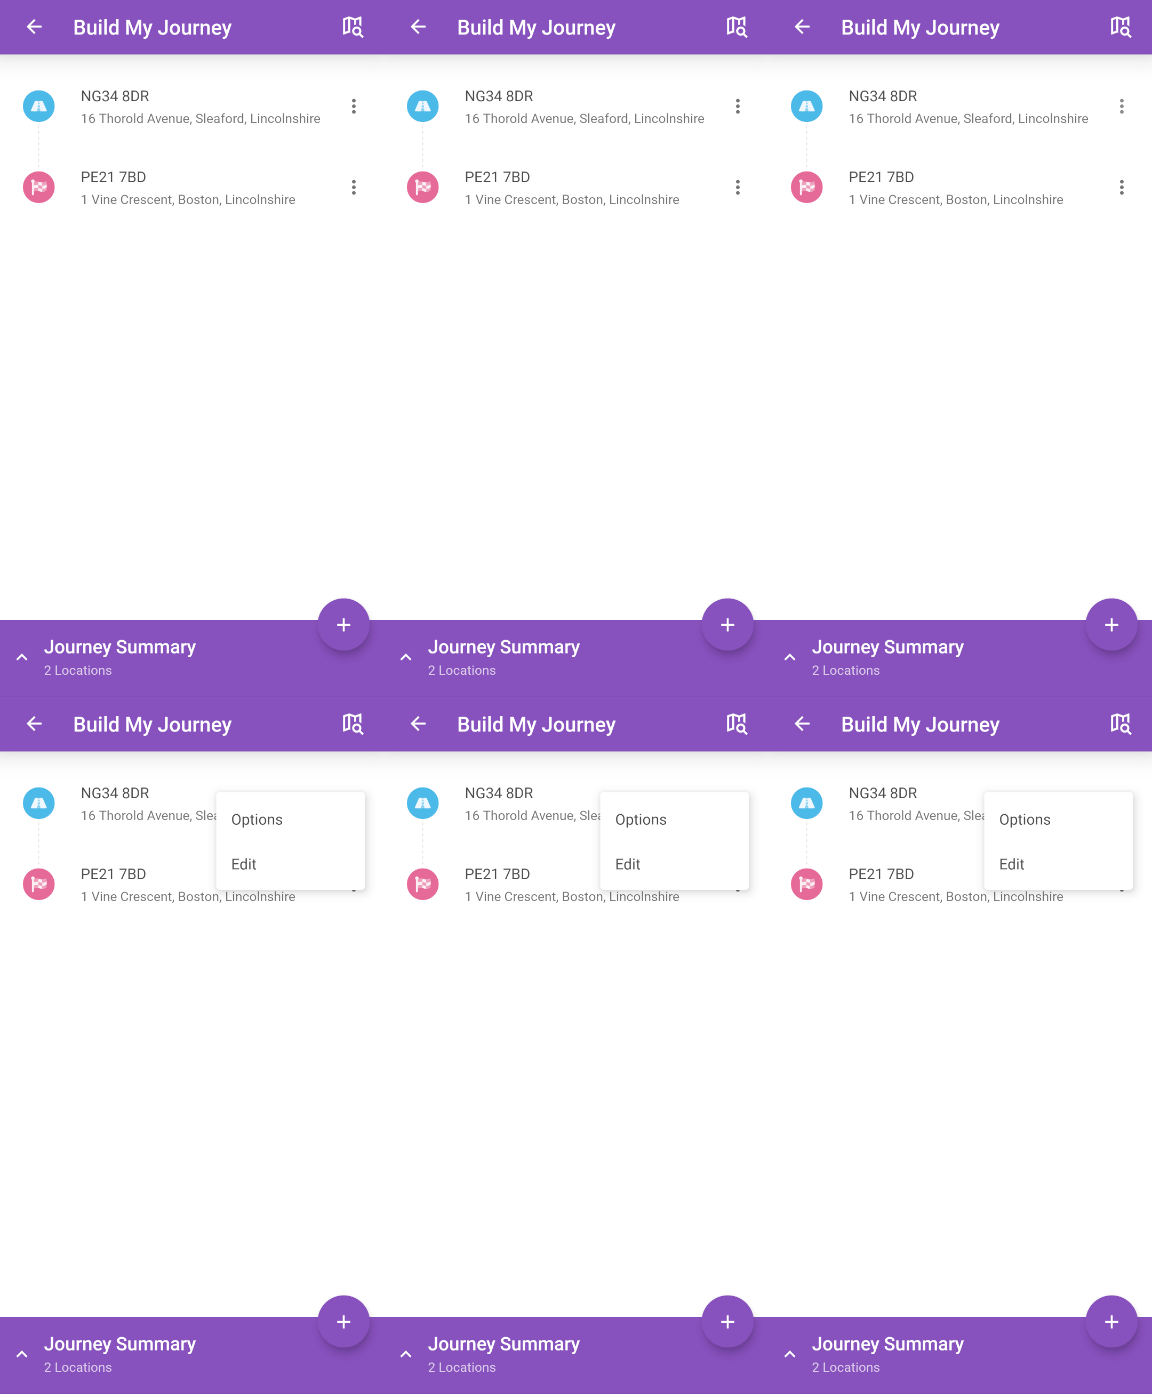
- If you want to apply a custom distance, add passengers, or add heavy/bulky equipment between these locations, tap the menu
 next to a location and then tap Options.
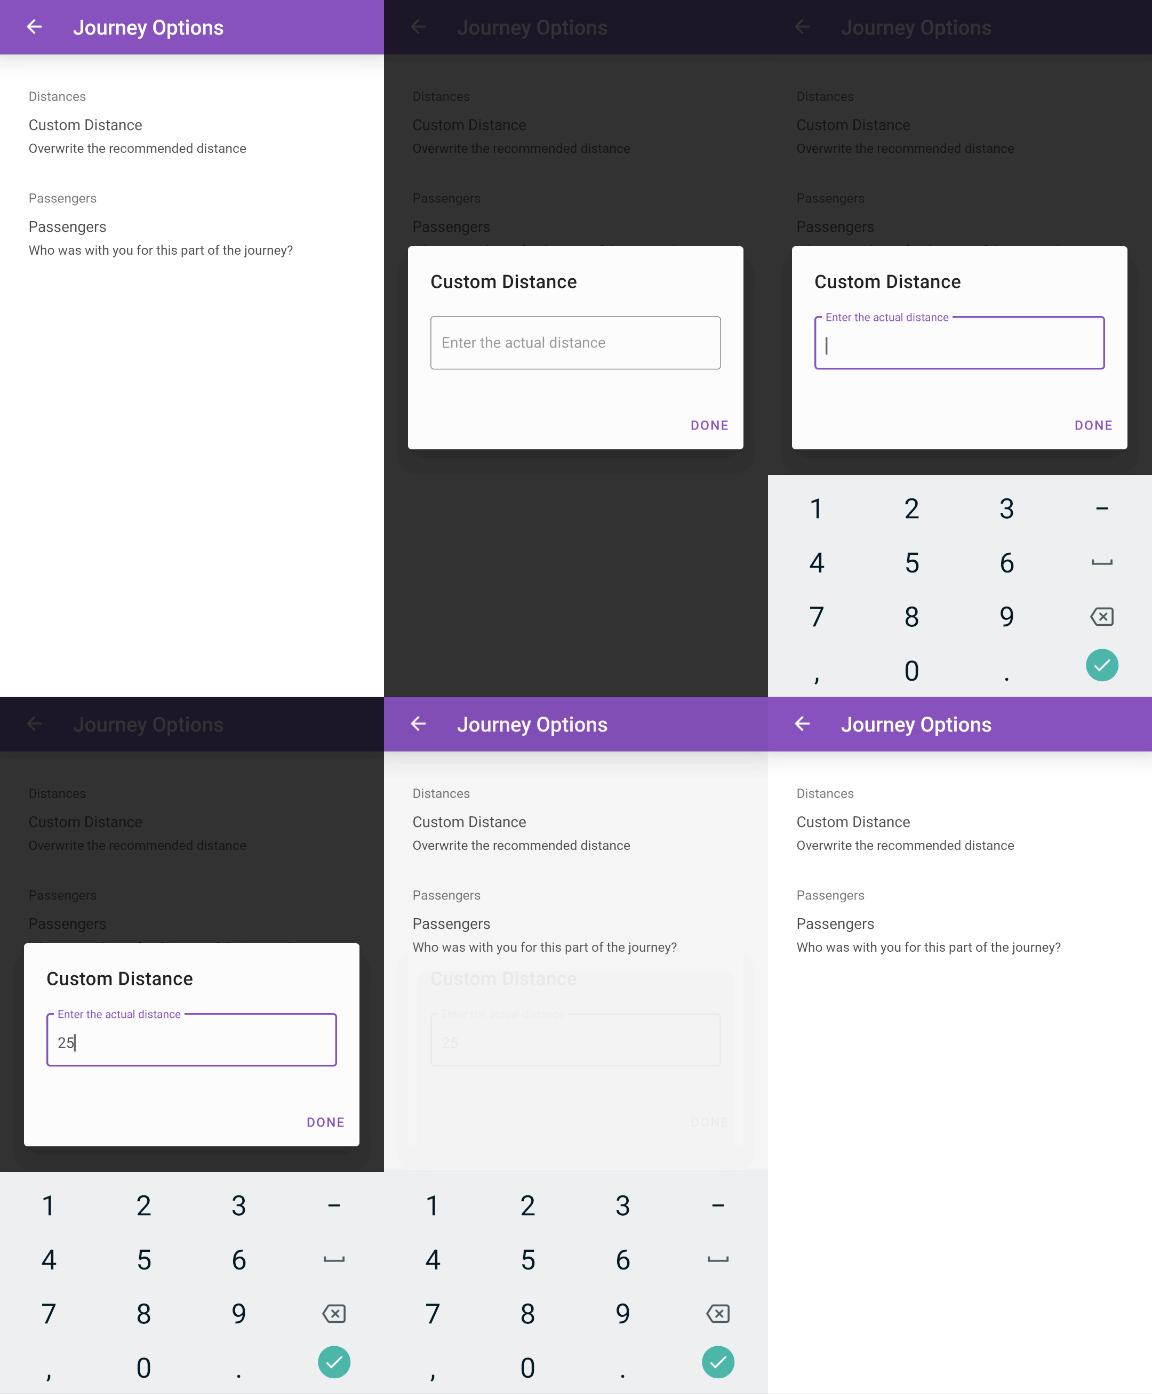
- Tap Custom Distance, enter a new value, and then tap Done.
- Tap Passengers. You will either be able to enter the number of passengers between these locations or enter the names of the passengers who accompanied you.
If you are required to enter the passenger names, begin by searching for the name of your passengers. Tap the person that you want to add as a passenger. If permitted, you can manually add a non-expenses user as a passenger by tapping Add Passenger. Tap to return to the 'Journey Options' page when you are done.
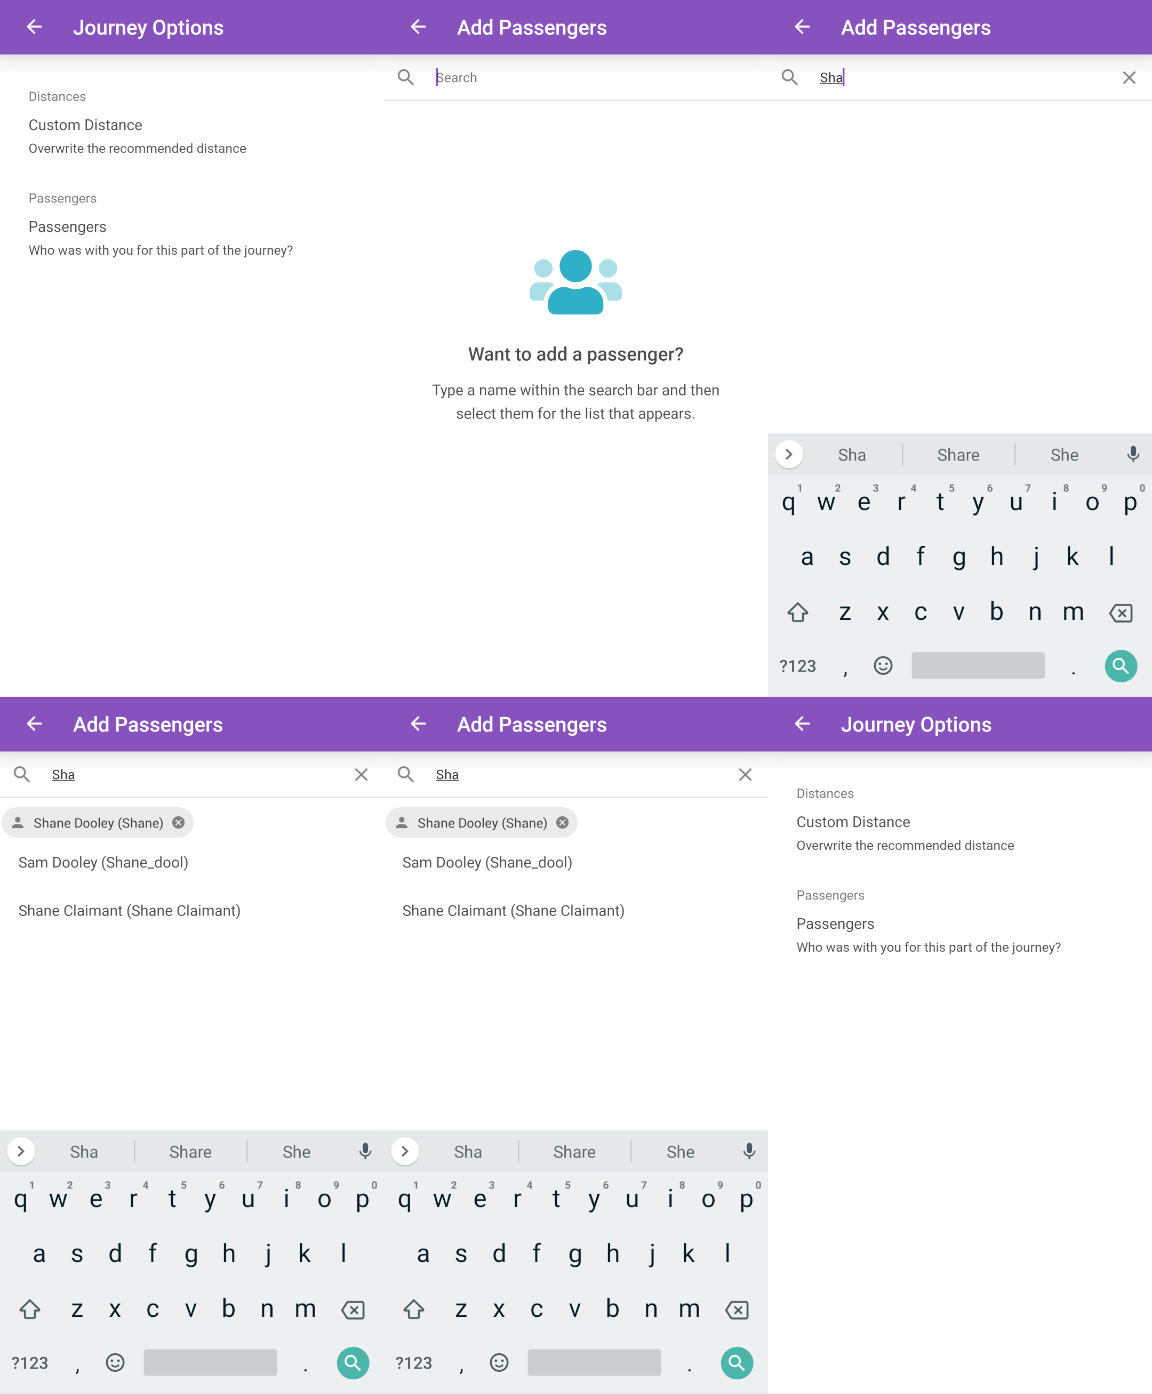
- Tap Custom Distance, enter a new value, and then tap Done.
- Tap the address to see extra information about your journey, such as the recommended distance. It might include the number of passengers and whether you travelled with heavy/bulky equipment.
- Tap Journey Summary to view the deductions and rates applied to the journey.

- If your organisation has enabled Route+, you can tap
 to view a map of the quickest or shortest route between your set locations.
- If your organisation has enabled Route+, you can tap
- Tap
 to add any further locations to your journey.
- If you want to edit or delete a location, tap the menu
 next to the location and then tap Edit or Delete.
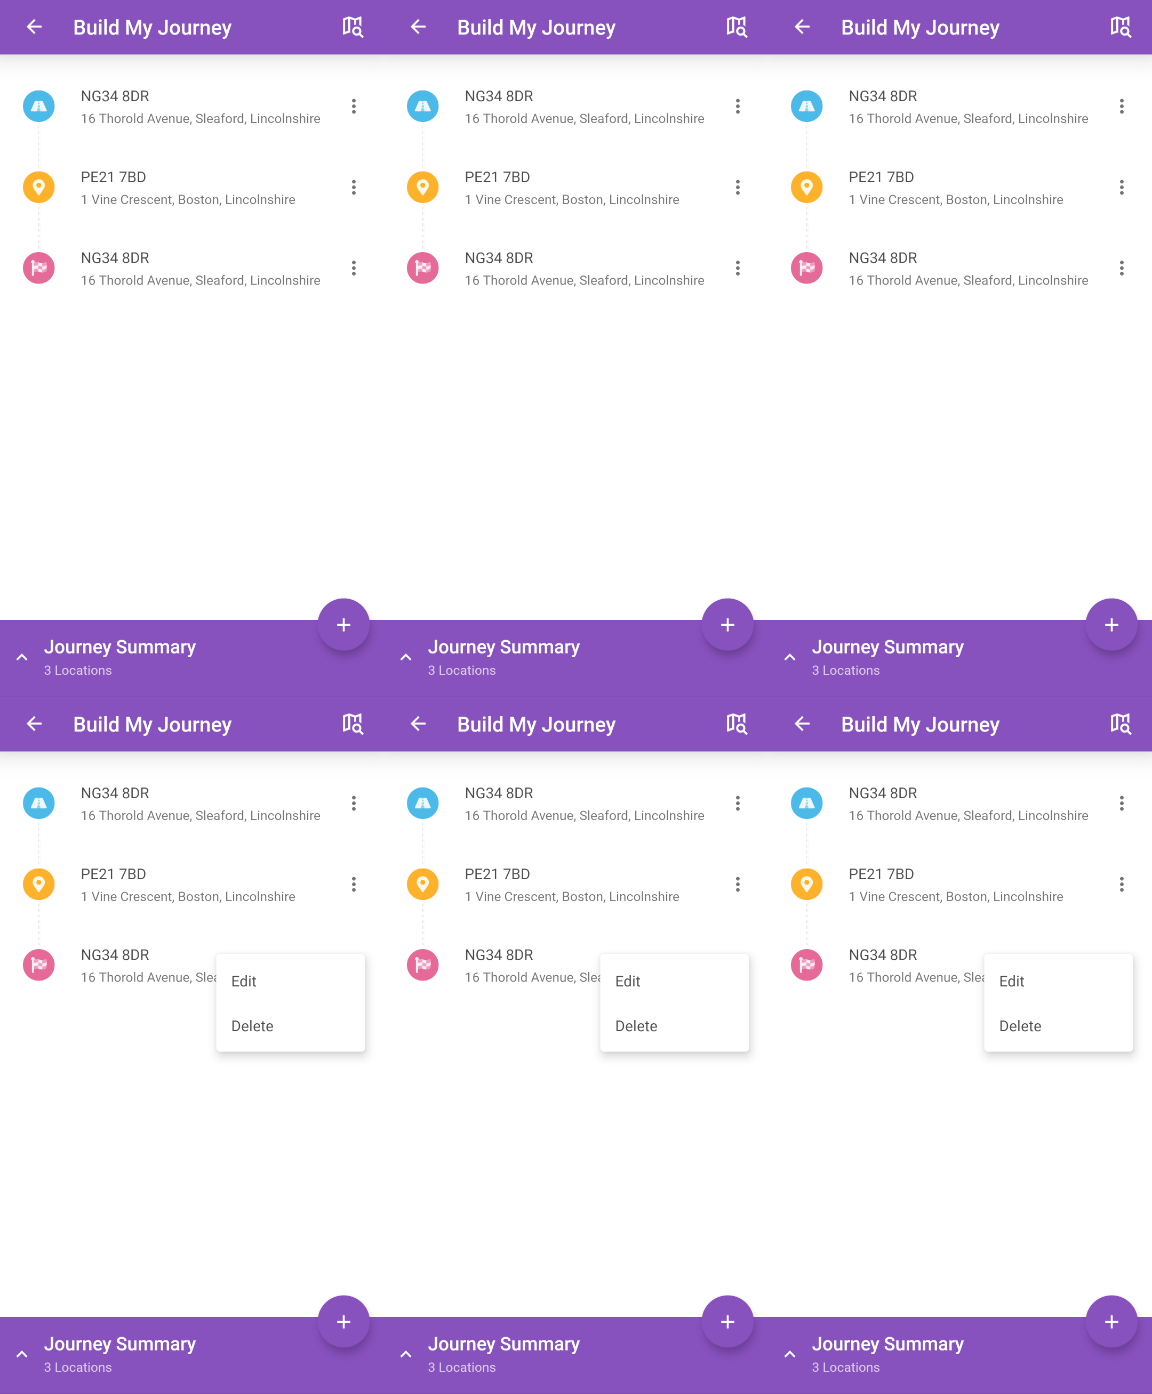
Note: You will not be able to delete a location if you have fewer than three locations.
- If you want to edit or delete a location, tap the menu
- When you have finished building your journey, tap
 to return to the expense form.
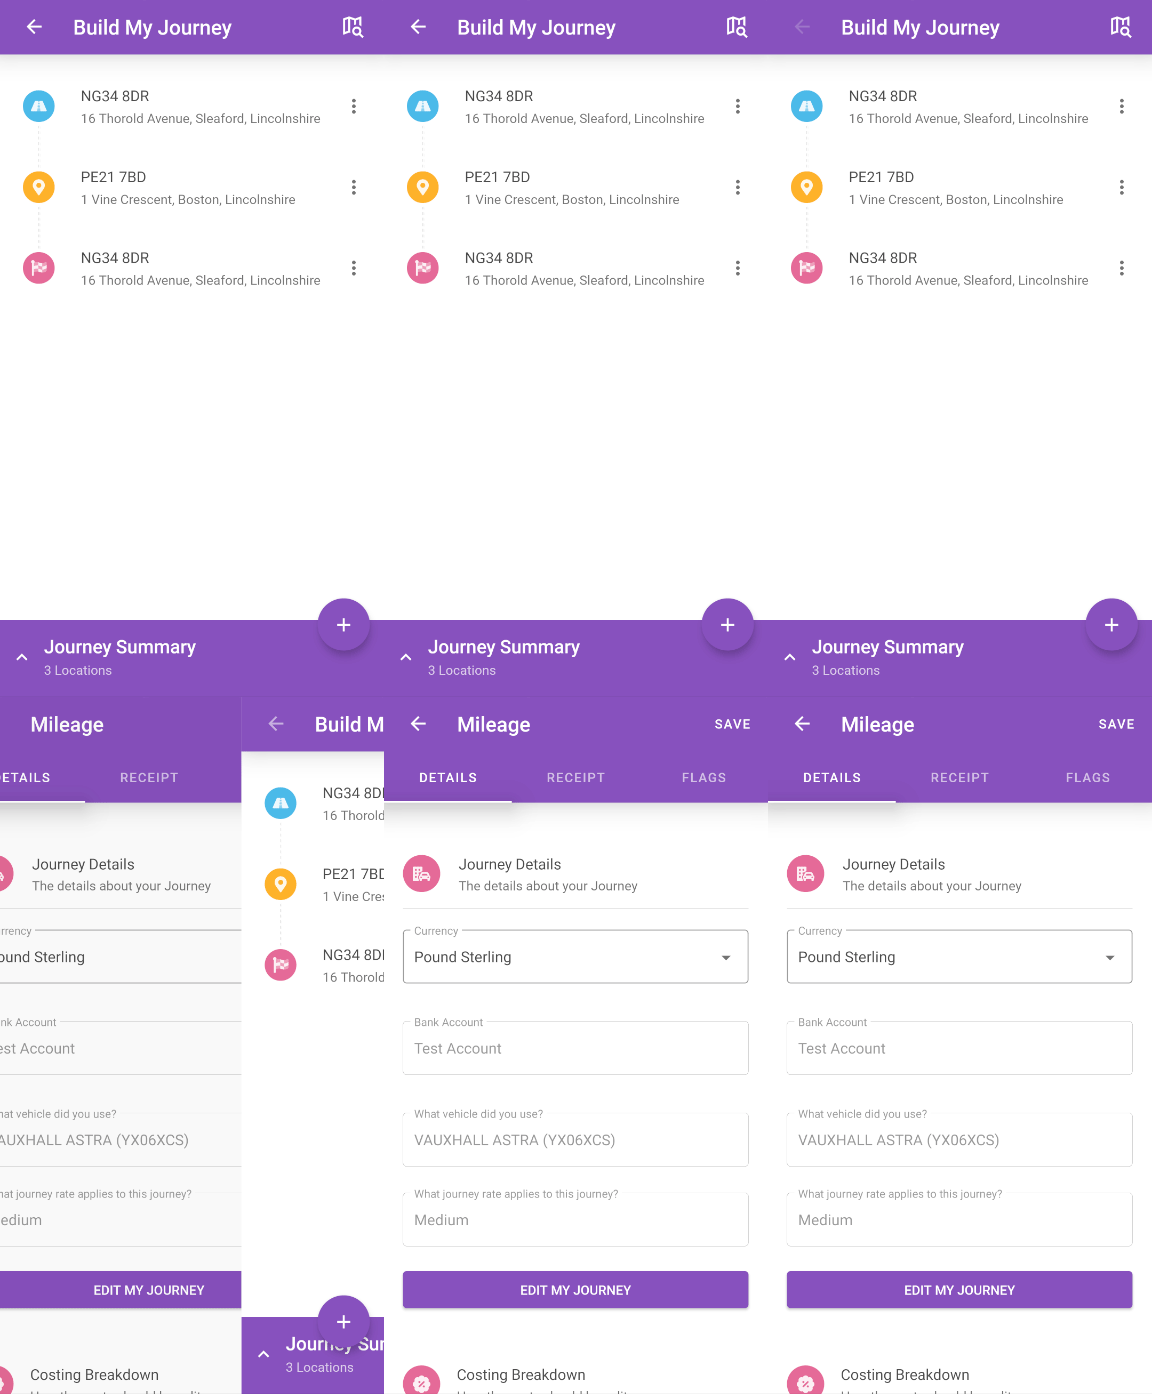
- Complete the rest of the expense item details. For more information on completing these fields, view the 'Adding Your Expense Information' tab at the top of this article.
- Tap SAVE to add the expense item to your claim.
- If any of your expense items have breached policy, they may have been flagged. Flagged expense items will be displayed with a badge
 . For information on how to view the flags against an expense item and provide justifications, view View Flag Information on an Expense.
 - If any of your expense items are blocked for breaching policy, you will be unable to save your expense.
- If any of your expense items have breached policy, they may have been flagged. Flagged expense items will be displayed with a badge
Fixed Excess Mileage

- From within the 'Journey Details' section, select the vehicle which was used for this journey. The 'Vehicle' field will automatically populate with your most recently used vehicle. To add a new vehicle, visit Manage My Vehicles.
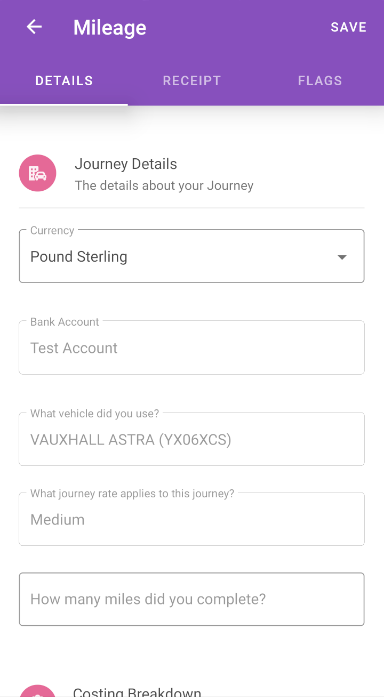
- Select the vehicle journey rate for the vehicle you have specified. This will determine the rate of reimbursement for the mileage. In some cases, a default vehicle journey rate may be enforced by your organisation.
- Enter the number of miles you travelled.
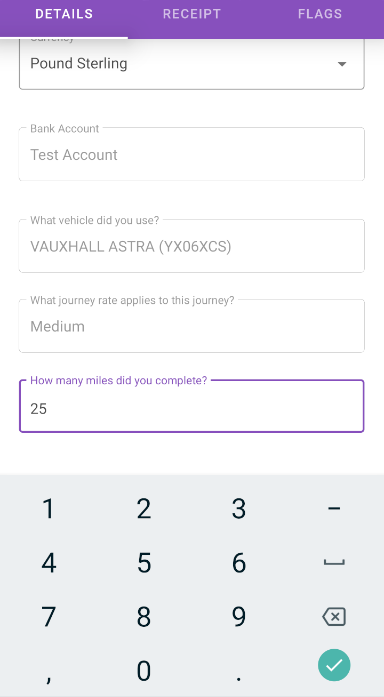
- Complete the rest of the expense item details. For more information on completing these fields, view the 'Adding Your Expense Information' tab at the top of this article.
- Tap SAVE to add the expense item to your claim.
- If any of your expense items have breached policy, they may have been flagged. Flagged expense items will be displayed with a badge
 . For information on how to view the flags against an expense item and provide justifications, view View Flag Information on an Expense.
 - If any of your expense items are blocked for breaching policy, you will be unable to save your expense.
- If any of your expense items have breached policy, they may have been flagged. Flagged expense items will be displayed with a badge
Fuel Card Mileage

- From within the 'Journey Details' section, select the vehicle which was used for this journey. The 'Vehicle' field will automatically populate with your most recently used vehicle. To add a new vehicle, visit Manage My Vehicles.

- Select the vehicle journey rate for the vehicle you have specified. This will determine the rate of reimbursement for the mileage. In some cases, a default vehicle journey rate may be enforced by your organisation.
- Complete the rest of the expense item details. For more information on completing these fields, view the 'Adding Your Expense Information' tab at the top of this article.
- Tap SAVE to add the expense item to your claim.
- If any of your expense items have breached policy, they may have been flagged. Flagged expense items will be displayed with a badge
 . For information on how to view the flags against an expense item and provide justifications, view View Flag Information on an Expense.
 - If any of your expense items are blocked for breaching policy, you will be unable to save your expense.
- If any of your expense items have breached policy, they may have been flagged. Flagged expense items will be displayed with a badge
Meal

Tip: Common Meal expense items are usually considered as Breakfast, Lunch, and Evening Meal.
- From within the 'Meal Details' section, fill out the required fields.
Field Description Employees Enter the number of employees that were present. This can impact the VAT portion of the expense item. Others Enter the number of other people present, excluding directors and other staff. For example, if you are entertaining a client, enter the number of people present from the client's organisation. This can impact the VAT portion of the expense item. Directors Enter the number of directors that were present. This can impact the VAT portion of the expense item. Partners & Spouses Enter the number of spouses or partners that were present. This can impact the VAT portion of the expense item. Remote Workers If you have multiple sites and host an event at one of the sites, the VAT portion of the expense may be impacted. A remote worker is defined as a member of staff that does not work at the hosting site. Was the Event Held in Your Home City? Selecting Yes may alter the amount of VAT that your organisation can reclaim. Only select Yes if the event was within a 5 mile radius of your place of work. Attendees Enter the names of each of the attendees. For example, if you took a client to a networking lunch, list the names of all employees who were in attendance, including the client's employees. Tip/Service Charge If you have given a tip or have incurred a service charge, provide the amount in this field.
Note: When entering the Total (Gross) for this expense item, ensure that it is inclusive of the tip.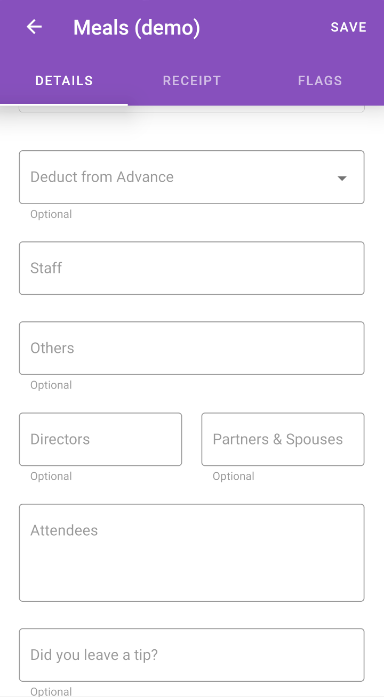
- Complete the rest of the expense item details. For more information on completing these fields, view the 'Adding Your Expense Information' tab at the top of this article.
- Tap SAVE to add the expense item to your claim.
- If any of your expense items have breached policy, they may have been flagged. Flagged expense items will be displayed with a badge
 . For information on how to view the flags against an expense item and provide justifications, view View Flag Information on an Expense.
 - If any of your expense items are blocked for breaching policy, you will be unable to save your expense.
- If any of your expense items have breached policy, they may have been flagged. Flagged expense items will be displayed with a badge
Hotel

- From within the 'Hotel Details' section, fill out the required fields.
Field Description Rooms Enter the number of rooms which were booked. Nights Enter the number of nights the hotel was booked for. 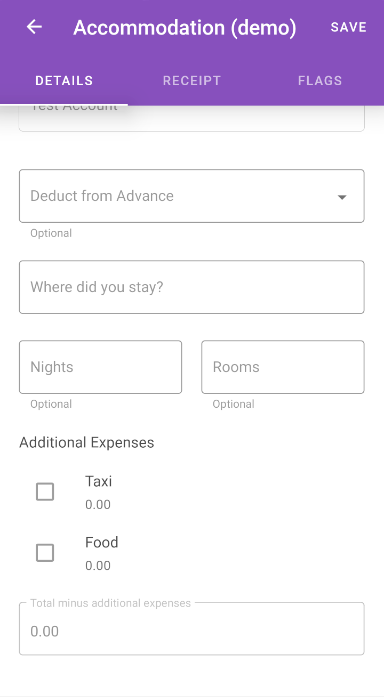
- Tap Where Did You Stay? and then you will be taken to the 'Select Hotel' page.
- Within the search bar, enter the name of the hotel you stayed at. If the hotel could not be found, tap Add Hotel to manually add it.
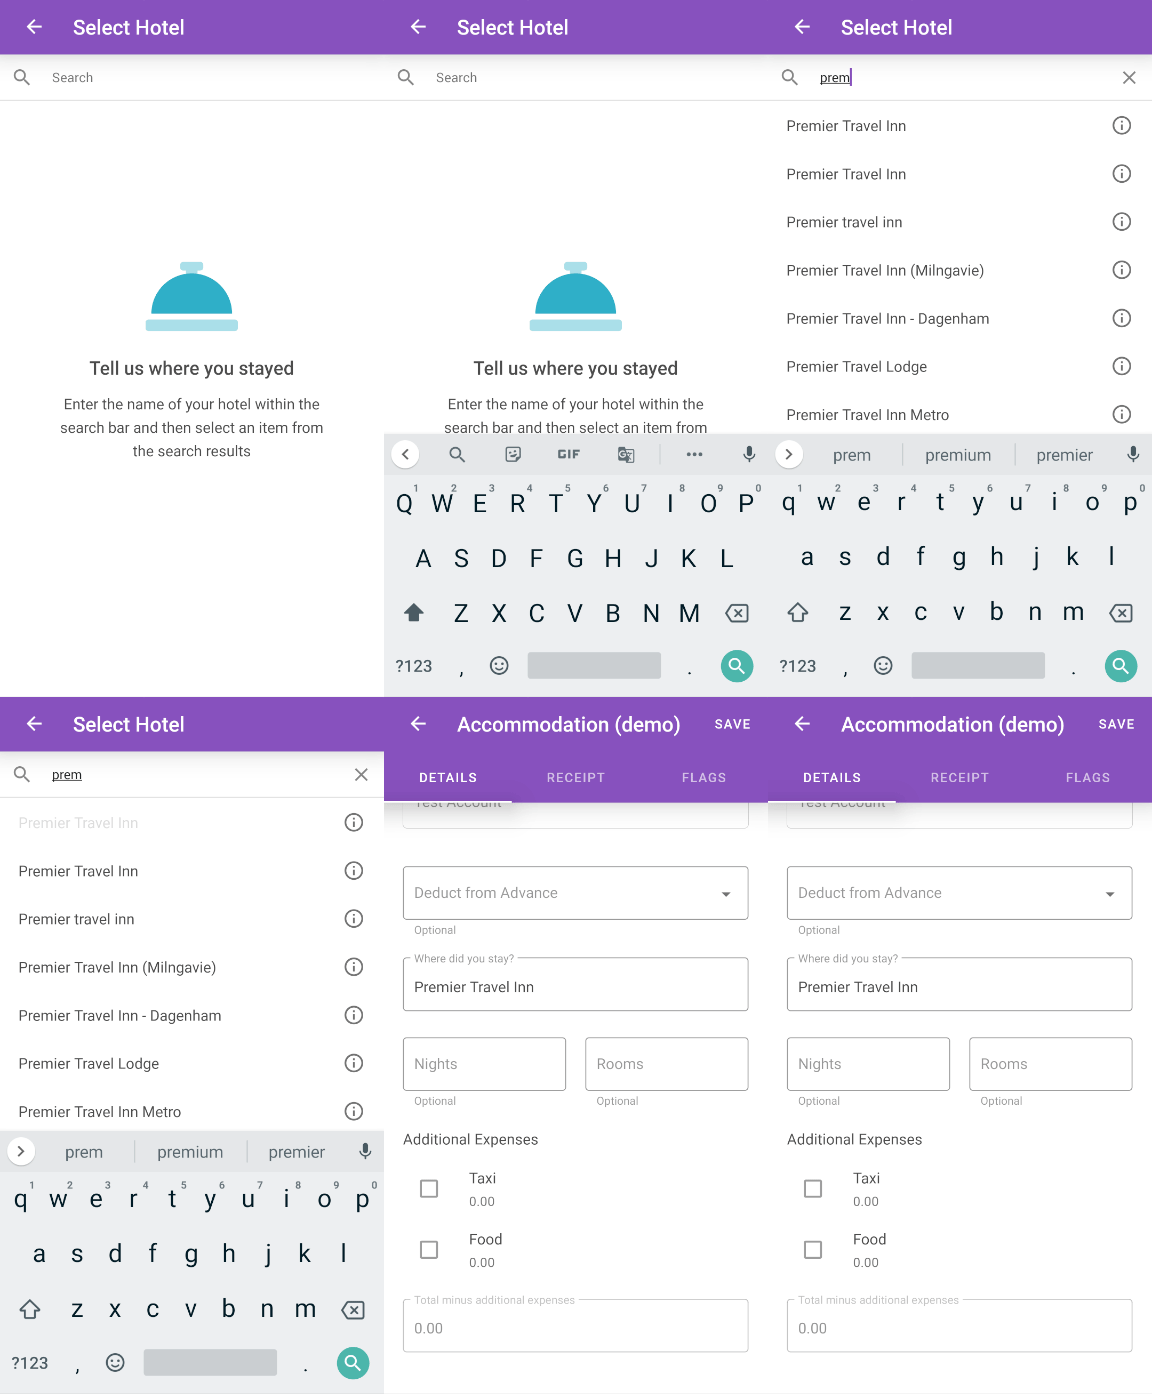
- Complete the rest of the expense item details. For more information on completing these fields, view the 'Adding Your Expense Information' tab at the top of this article.
- Tap SAVE to add the expense item to your claim.
- If any of your expense items have breached policy, they may have been flagged. Flagged expense items will be displayed with a badge
 . For information on how to view the flags against an expense item and provide justifications, view View Flag Information on an Expense.
 - If any of your expense items are blocked for breaching policy, you will be unable to save your expense.
- If any of your expense items have breached policy, they may have been flagged. Flagged expense items will be displayed with a badge
Split Expense Item
If your organisation has configured an expense item so that it can be split, you will see the 'Additional Expenses' section within the 'Journey Details, 'Hotel Details', 'Meal Details', or 'Cost Details' section. The expense items which you can split from the primary expense item by will be listed in this section.
A common example of a split expense would be a Hotel expense, which is split so that you can enter expenses for breakfast, Wifi, and mini bar separately.
- Select the additional expense you want to split from the primary expense and then complete the fields for the split item.
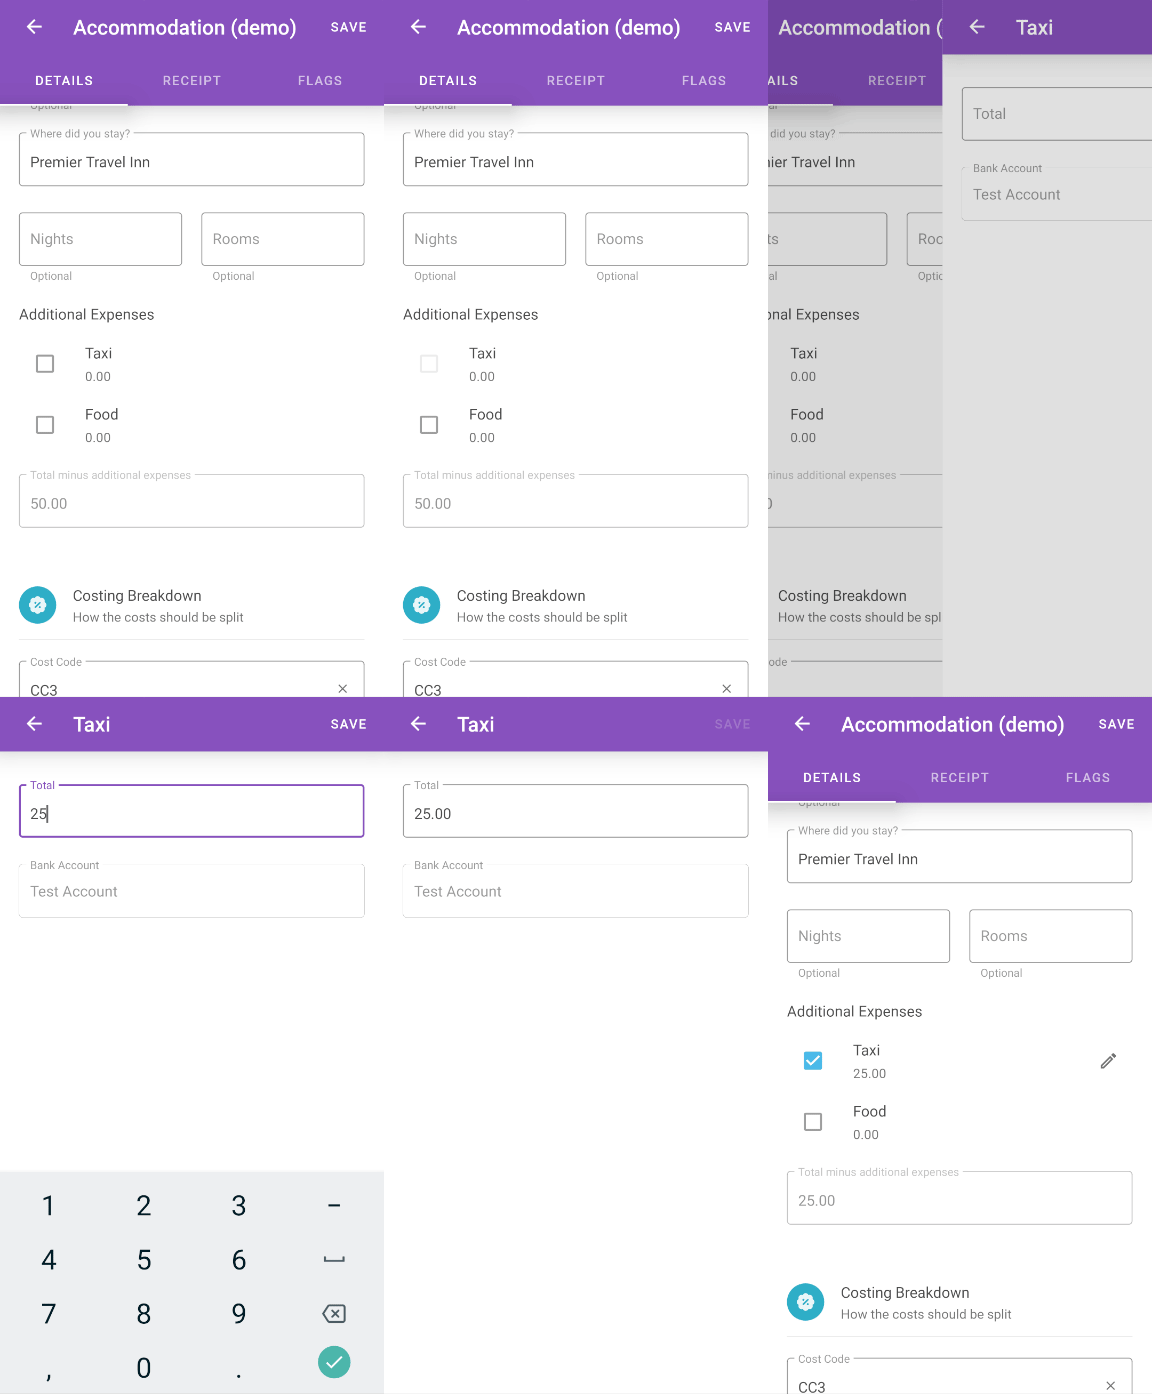
- Tap SAVE to add the additional expense item to your claim. This will update the 'Total Minus Additional Expenses' field.
- To delete an additional expense, unselect the additional expense by tapping the check box. This will reset the value for the additional expense to £0.00.
Daily Allowance

A Daily Allowance is an expense item where the amount available to be claimed is determined by number of hours worked. For example, your organisation may allow a food allowance of £5 to be claimed for every 7 hours that have been worked which then raises to £10 after 10 hours. When entering the details for the expense, and after you have entered the number of hours, Selenity
Expenses Mobile will automatically calculate how much you can be reimbursed for.
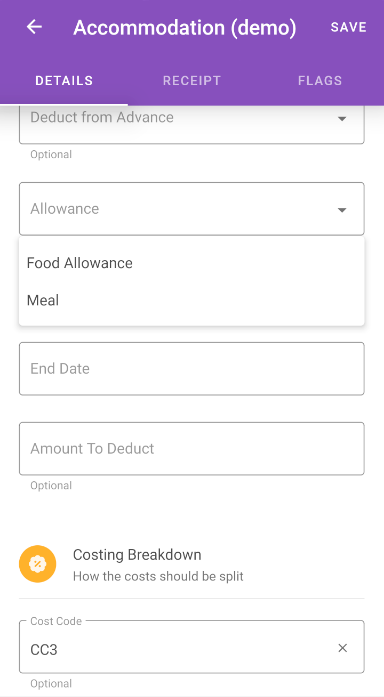
- Within the 'Daily Allowance Details' section, tap on the Allowance field to display a list of available allowances and then tap the allowance which you want to claim for. In our example below, this is where you would select the 'Lunch Allowance'. The allowances available to claim will vary between different organisations and will contain different allowance rates and allowance hour thresholds.
- Enter the start date and time.
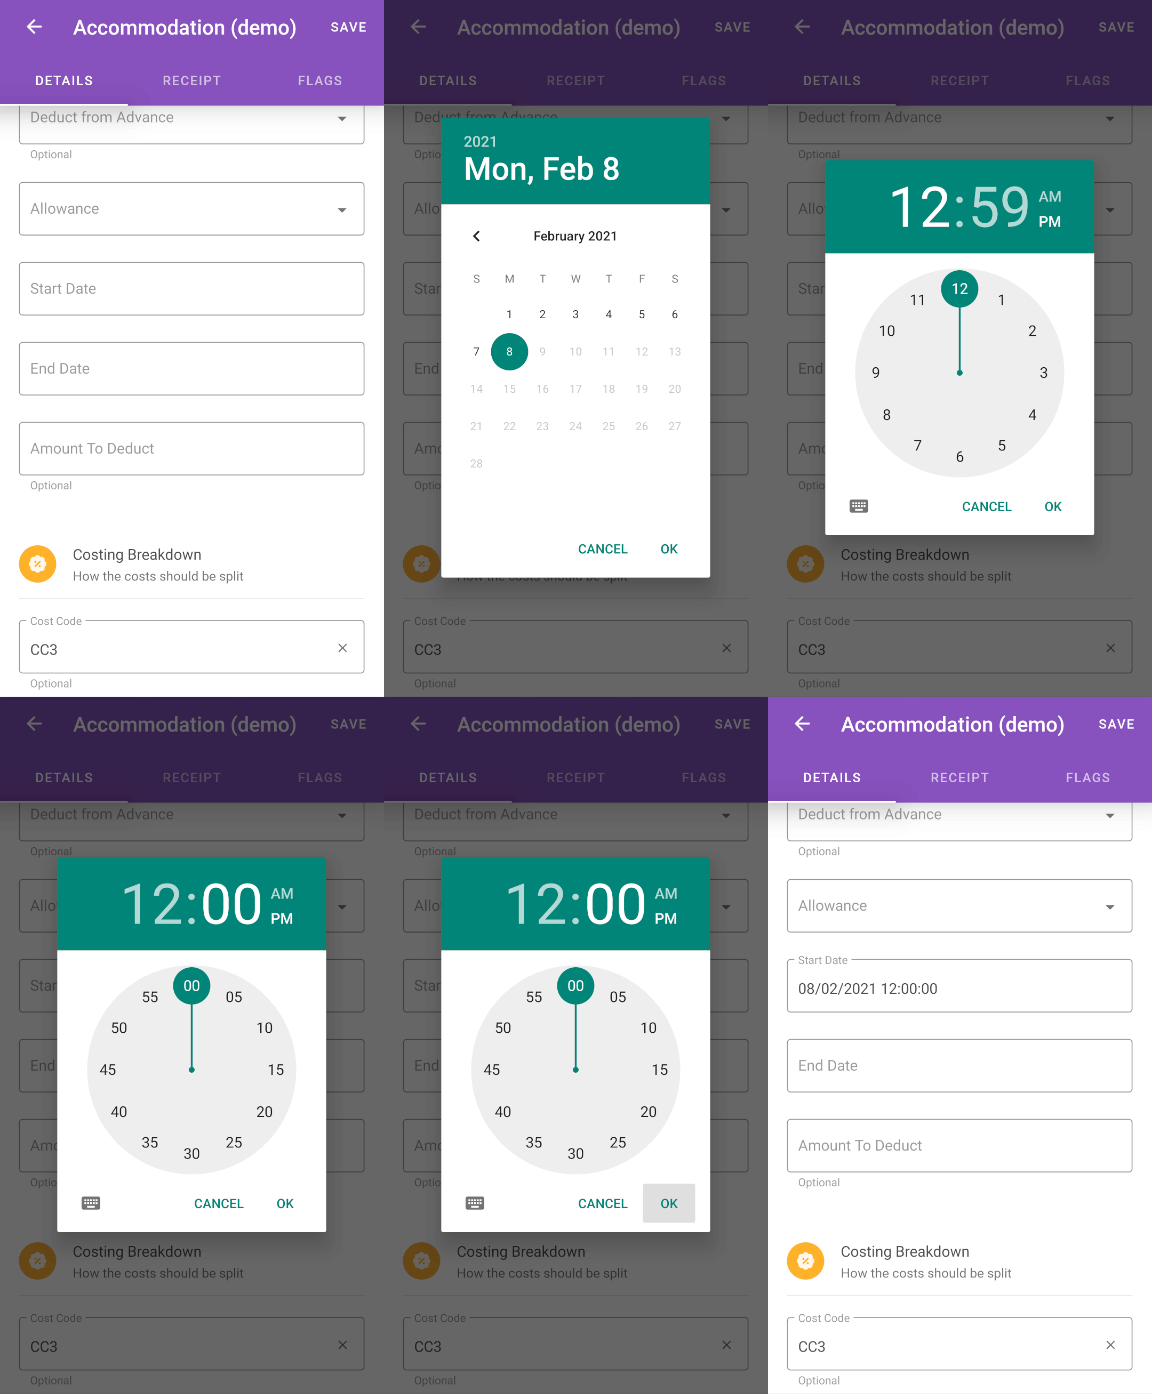
- Enter the end date and time.
- If an amount needs to be deducted from the allowance, enter the amount in the 'Amount to Deduct' field.
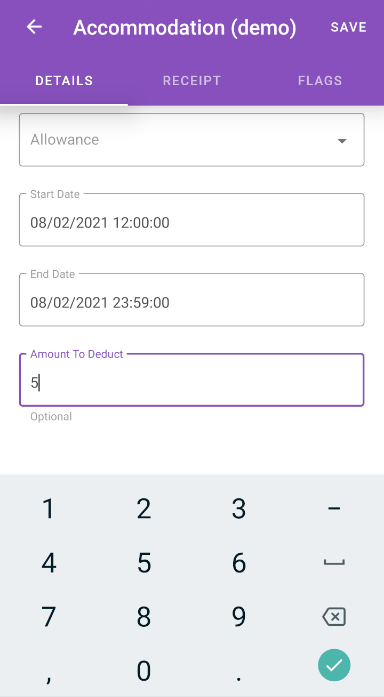
Example: Your work involves travelling, so your company provides you with a daily allowance based on the hours you are working. After 5 hours, you are allowed to spend £10 on food and after 10 hours you are allowed to spend a further £15, meaning your total is £25.
You work for 10.5 hours meaning you are eligible for the whole £25 allowance. You buy lunch for £7 and an evening meal for £13, totalling £20.
You are required to put 5 in the 'Deduct Amount (in GBP)' field because you didn't spend the remaining £5 of your allowance. - Complete the rest of the expense item details. For more information on completing these fields, view the 'Adding Your Expense Information' tab at the top of this article.
- Tap SAVE to add the expense item to your claim.
- If any of your expense items have breached policy, they may have been flagged. Flagged expense items will be displayed with a badge
 . For information on how to view the flags against an expense item and provide justifications, view View Flag Information on an Expense.
 - If any of your expense items are blocked for breaching policy, you will be unable to save your expense.
- If any of your expense items have breached policy, they may have been flagged. Flagged expense items will be displayed with a badge
Fixed Allowance

A Fixed Allowance is an expense item where the amount is predetermined. You should enter the number of times you have claimed for this expense. For example, your organisation may have a 'Lunch Fixed Allowance' set at £5. During the month, you incur this lunch expense 10 times. When entering your monthly claim, you only need to specify the number of times you used this allowance and Selenity
Expenses Mobile will automatically calculate the reimbursement (£5 x 10).
- Within the 'Allowance Details' section, enter the number of times you claimed this allowance. The number entered must be above 0 and a maximum of 3 digits.
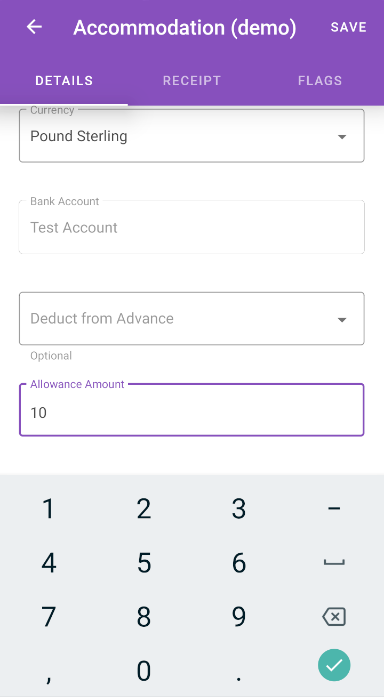
- Complete the rest of the expense item details. For more information on completing these fields, view the 'Adding Your Expense Information' tab at the top of this article.
- Tap SAVE to add the expense item to your claim.
- If any of your expense items have breached policy, they may have been flagged. Flagged expense items will be displayed with a badge
 . For information on how to view the flags against an expense item and provide justifications, view View Flag Information on an Expense.
 - If any of your expense items are blocked for breaching policy, you will be unable to save your expense.
- If any of your expense items have breached policy, they may have been flagged. Flagged expense items will be displayed with a badge

 . Some expense items will not be available on certain dates; this is configured by your organisation.


 . For information on how to view the flags against an expense item and provide justifications, view

 next to the location and then tap Set Nickname. Tap
  to favourite a location and tap
  to unfavourite a location. Account wide favourites will be shown with a
  and cannot be unfavourited. Favourites can be viewed in the 'Favourites' tab.


 to return to the 'Journey Options' page when you are done.

 to view a map of the quickest or shortest route between your set locations.


