Permissions
You will require the following permissions:
- "Receipts can be uploaded to expense items" General Option must be activated
Note: This guide assumes that your receipts have already been attached to an expense or claim header. If you require assistance attaching a receipt, view Add a Receipt.
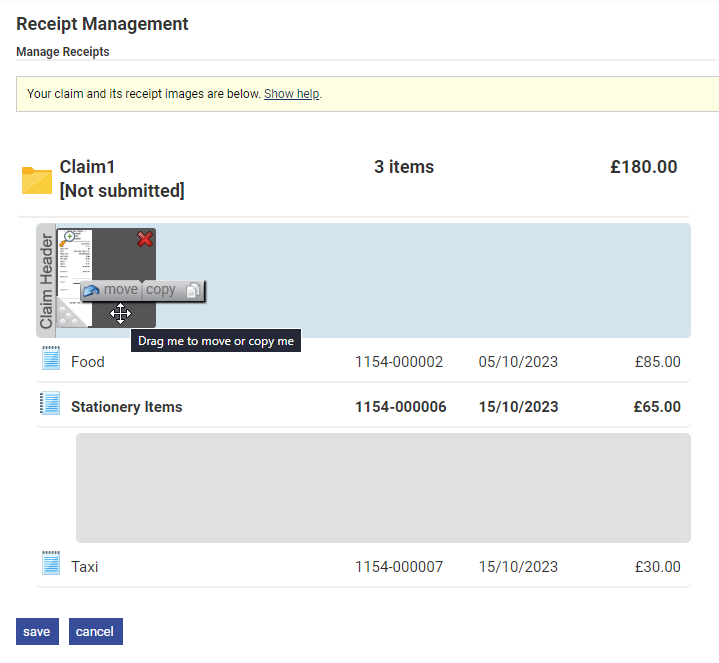
The Receipt Management page will display when you click the upload receipt/view receipt icon on the Claim Details page. This will display the claim and any expenses which have been added to the claim. There will also be an information box which provides useful tips for interacting with the page.

- Any receipts that are not currently associated with an expense will display in the claim header section.
- Click an expense to expand that section and display any receipts which have been attached.
Move/Copy a Receipt
- Click and hold the left mouse button on the receipt image that you want to move or copy.
- While still holding the left mouse button, drag the receipt to the expense you want to attach it to and release the mouse button over the receipt area (shaded box), which is located under the expense header.

- You will be provided with two options:
- Move – This will move the receipt image from its original location and attach it to the new location.
- Copy – This will make a copy of the receipt image and attach the copy to the new location. The original receipt image will still be attached to the same location. This is useful in scenarios where one receipt image is applicable to multiple expenses.
- Move – This will move the receipt image from its original location and attach it to the new location.
Note: You are unable to have a receipt image and a copy of that receipt image attached to a single expense or claim header. Receipt Management will automatically delete the duplicate after the 'attach' button has been clicked.


