Permissions
You will require an Access Role with the following permissions:
- Imports/Exports
Note: In order to use the Import Data Wizard, you will need to use Internet Explorer in compatibility mode.
- Navigate from the Home page to Administrative Settings | Imports/Exports | Import Data Wizard.
- Select a File Type from the drop-down list.

- Click Browse to search your computer for the import file which matches the File Type you have selected. In this example, the following table will be used to import Employees into the system.
ImportDataEmployees.pdfNote: In order to import data, all mandatory fields for the product area destination must be included.
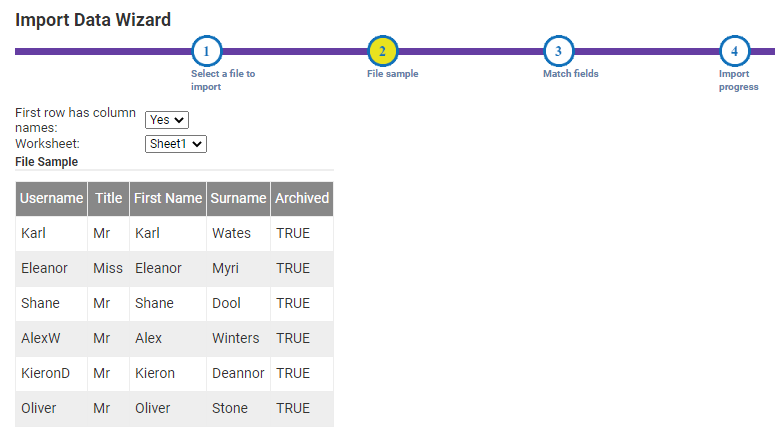
- Click Next to proceed to the File Sample screen. A screenshot of your uploaded file will display.

- Depending on the file you are importing, there will be different options available to configure:
Field Description First row has column names From the drop-down list select Yes or No to confim if the first row of the spreadsheet includes column names that are not required in the import. Worksheet From the drop-down list, select which worksheet to upload. Header rows to skip Enter which rows you do not wish to include in the import. - Click Next to proceed to the Match Fields screen. Here you can select which report you would like to import the information to.
- From the drop-down list, select a Destination where you like to import the file to. The Source Column will display the headings of the data you wish to import.
- In the Destination Column, click on each cell to display a drop-down list of fields allowing you to select a location to import your data to. For example, in the image above, the first Source Column cell is 'Username' so click on the adjacent Destination Column cell and select 'Username' from the drop-down list to match the two fields.
- Once you have completed the matching process, click Next to proceed to the Import Progress screen.
- In the Default Value column, click on each cell to enter a default value for the fields that do not contain import data.
- Click Next to begin the import. A log will display if the import is successful or if any errors occur:
- If the import is successful, click Finish to return to the Exports page or Previous to return to the previous step to correct any errors, if they occur.


