General Troubleshooting
If you are having issues with Selenity Expenses Mobile and are not entirely sure what the issue could be, you should follow the general troubleshooting help below to see if this will fix any issues that you are having.
Clear your cached data
Android (Google Pixel 3XL)
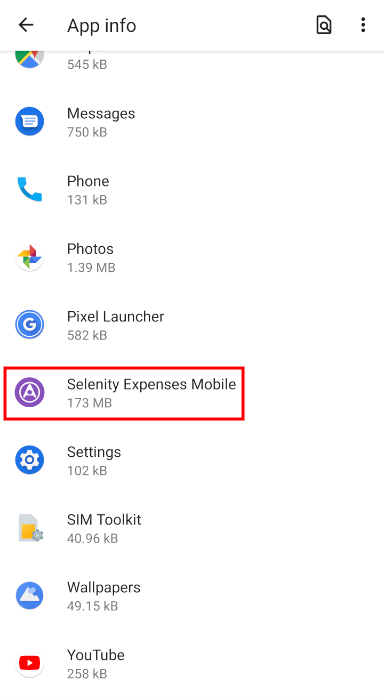
- Locate 'Selenity
Expenses Mobile' within your device's 'Settings' menu. This can usually be found within 'Apps' but will be different for each device type or operating system.

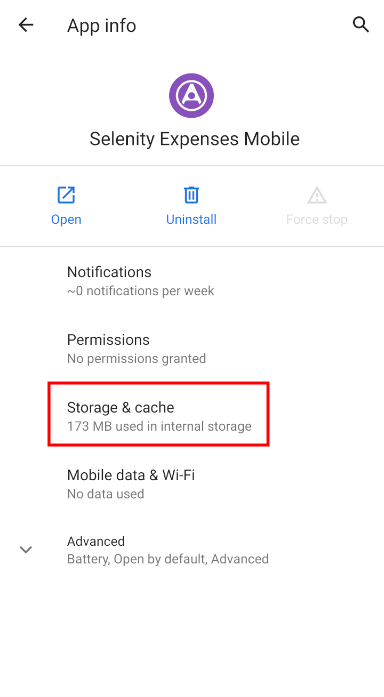
- If the app is running in the background you will need to tap 'Force Stop'. This will close the app completely on your device.
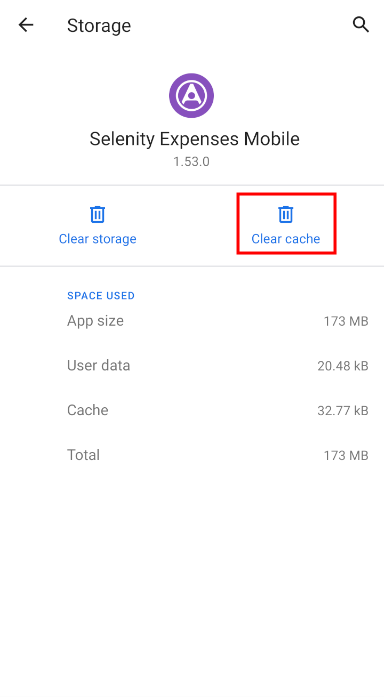
- Tap Storage and then tap Clear Data.

- Tap Clear Cache.

iOS
This works differently for iOS as you will need to delete the app and reinstall it to clear any cached data.
- Head to Settings | General | iPhone Storage.
- Locate 'Selenity
Expenses Mobile' in the list of apps on the iPhone Storage screen and then tap to view details. The 'Documents & Data' will show how much cached data there currently is for the app.
- Tap Delete App and then confirm.
- Once the app is deleted, you can do a fresh install of Selenity Expenses Mobile from the app store. For more information on this, view Mobile - Download Selenity Expenses Mobile
Sign out and then sign back in
- When signed in to Selenity
Expenses Mobile, tap the Navigation Menu
 .
. - Tap Sign Out. A warning message will display.
- Tap Sign Out to confirm. You will then be returned to the sign-in page.
- For help logging back into Expense Mobile, visit Mobile - Sign In.
Update your mobile device software
Sometimes the version of the operating system that is on your device will affect how certain apps perform. It is best to make sure that you are running the latest version available for your mobile device. The installation instructions will vary for each device, but a quick google search will be able to provide you with the best process to update the operating system on your mobile device.
Update your version of Selenity Expenses Mobile
App updates not only include new features and enhancements, but also include bug fixes, so you should always make sure that the apps on your device are up to date.
If automatic app updates are enabled on your device, Selenity Expenses Mobile will update itself automatically at a set time. However, if this is not enabled or the app hasn't updated for any other reason, you should manually update Selenity Expenses Mobile to the latest version.
Android
- Tap on the Google Play Store icon.
- Tap
 in the search bar. This will open the navigation menu.
 - Tap My Apps & Games. This will default to the 'Updates' tab, listing each of the apps installed on your device which need to be updated.
- Locate 'Selenity
Expenses Mobile' in the list of apps and then tap Update. Alternatively, tap Update All at the top of the list to update all apps.
iOS
- Tap on the app store icon.
- Tap the 'Account' icon in the top right corner of the screen. If you do not have automatic updates enabled, a badge will display how many updates you have pending.
- The 'Account' page will display any upcoming automatic updates or available updates.
- Locate 'Selenity
Expenses Mobile' and then tap Update.
- Enter your password when prompted and the update will begin.
Reinstall Expense Mobile
Android (Google Pixel 3XL)
- Locate Selenity
Expenses Mobile within your device's 'Settings' menu. This can usually be found within 'Apps' but will be different for each device type or operating system.

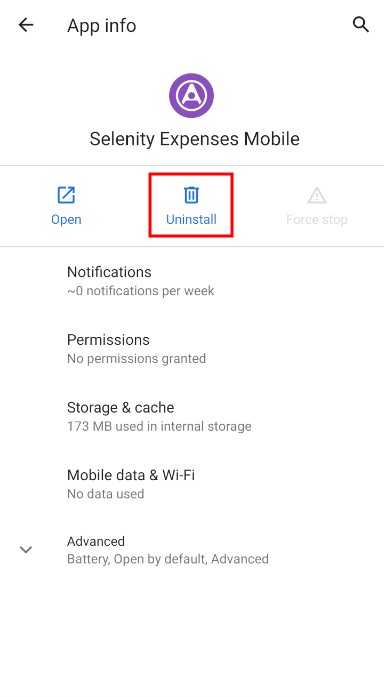
- If the app is running in the background you will need to tap Force Stop. This will close the app completely on your device.
- Tap Uninstall and then confirm.

- Once uninstalled, you can head to the Google Play Store and re-download Selenity Expenses Mobile again. For more information on how to do this, view Mobile - Download Selenity Expenses Mobile.
iOS
If you followed the steps above, during the process of clearing your cached data you will have deleted the app and performed a clean reinstall.


 .
.
