Permissions
You will require the following permissions:
- Base Information
- Expense Items
General Details
Note: This article is intended to be used as guidance and may not reflect your system setup. Please contact your system administrator for further information.
- Navigate from the Home page to Administrative Settings | Base information | Expense Items.
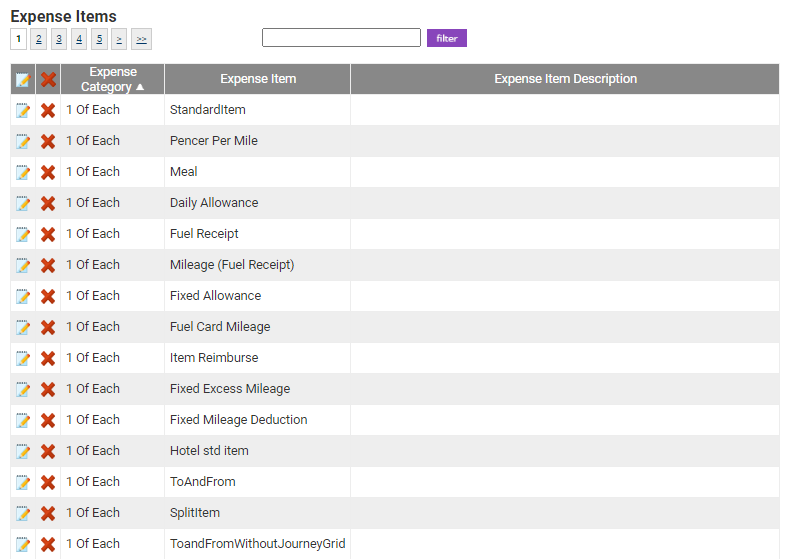
- From the 'Page Options' menu, click on New Expense item.

- Within the General Details tab, complete the General Details section.
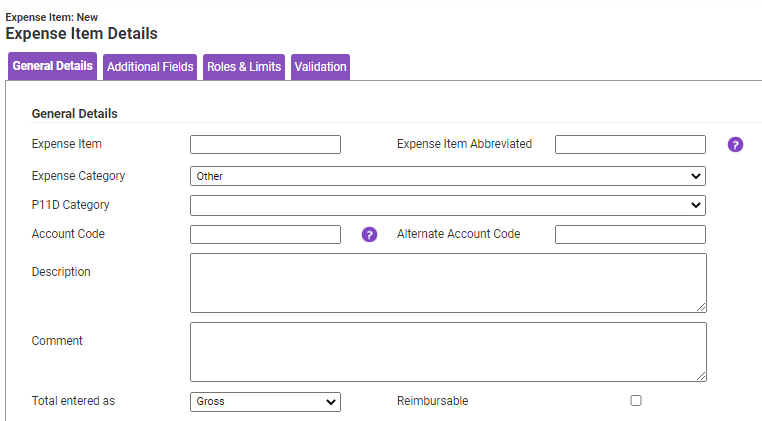
Field Description Expense Item Enter a name for the expense item. Expense Item Abbreviated Enter an abbreviated name if required. The abbreviated name appears in the My Expense Items shortcut menu on the Add/Edit Expenses screen. Expense Category Select the appropriate expense category from the drop-down list. P11D Category Select a P11D Category from the drop-down list. Account Code Enter an account code. Alternate Account Code Enter an alternative account code. Description Enter a description for the item. This description is displayed on the 'Claimable Items' menu. Comment Enter a comment if you want to emphasise a certain aspect of policy when a claimant selects this expense. This comment is displayed on the Add/Edit Expense screen presented in a Yellow Box. Total entered as Select 'Gross' or 'Net' total from the drop-down list. Reimbursable Click to specify if the item is reimbursable (if this is not selected the claimant will not receive reimbursement for the item, e.g. when hotels are booked and paid for by your organisation). - Enter any country account codes your organisation may require.

- Select the expense Item Type from the drop-down list. The item type which you select will determine what type of expense this is and will display further fields for you to complete.

The remaining tabs at the top of this guide will explain the different details you may be required to enter for different types of expense item.
Daily Allowance
- Within the Calculation section, from the Item Type drop-down list, select Daily Allowance.
- Select the check boxes against allowance types to enable the claimant to choose that allowance when adding an expense. For more information on how to create an allowance, view Create an Allowance.

- (Optional) Within the Split Expense Items section, click Add Split Item to display a window that allows you to select additional expense items to add in order to break out the cost incurred on the expense item. For more information, view Create a Split Expense Item.

- (Optional) Within the VAT Details section, click Add VAT Range to display a window which allows you to set the VAT details for the expense item. For more information, view Configure VAT on an Expense Item.

- Within the 'Additional Fields' tab, select the check boxes of any extra fields you wish to display on the 'Add Expense' page when an employee claims the allowance.

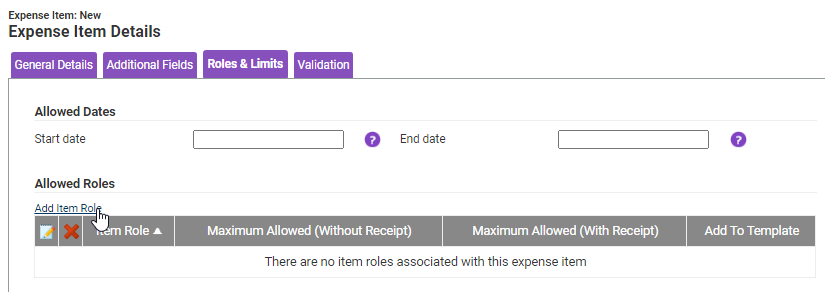
- Within the 'Roles & Limits' tab, enter a Start and End date of when the allowance can be claimed and click Add Item Role to add the allowance to specific Item Roles.
- (Optional) Within the Validation tab, select the 'Validate this expense type' check box to ensure that when the expense item is claimed it will be validated via the Assure Expenses Expedite Validation service (licenced element).
Note: The Validation tab will only be visible for organisations that have Assure Expenses Expedite Validation (licenced element). For more information, view Assure Expenses Expedite or contact your RLDatix Account Manager.
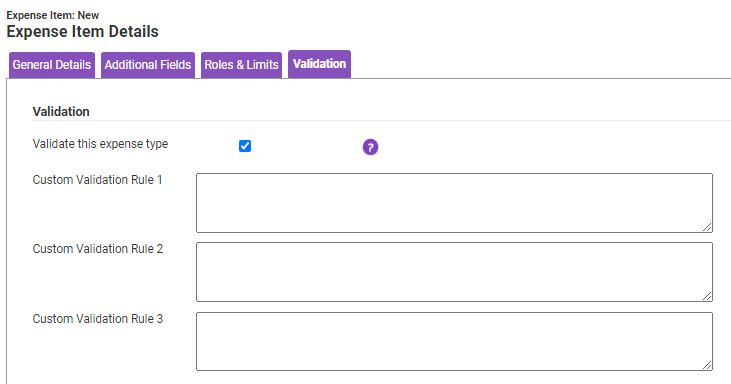
Note: The Custom Validation Rules are read-only and describe any additional validation checks configured by RLDatix.
- Click Save to confirm or Cancel to discard any changes made and return to the Expense Items page.
Fixed Allowance
- Within the Calculation section, from the Item Type drop-down list, select Fixed Allowance.
- Enter an Allowance Amount employees are permitted claim.

- (Optional) Within the Split Expense Items section, click Add Split Item to display a window that allows you to select additional expense items to add in order to break out the cost incurred on the expense item. For more information, view Create a Split Expense Item.

- (Optional) Within the VAT Details section, click Add VAT Range to display a window which allows you to set the VAT details for the expense item. For more information, view Configure VAT on an Expense Item.

- Within the Additional Fields tab, select the check boxes of any extra fields you wish to display on the Add Expense page when an employee claims the allowance.

- Within the Roles & Limits tab, enter a Start and End date of when the allowance can be claimed and click Add Item Role to add the allowance to specific Item Roles.

- (Optional) Within the Validation tab, select the 'Validate this expense type' check box to ensure that when the expense item is claimed it will be validated via the Assure Expenses Expedite Validation service (licenced element).
Note: The Validation tab will only be visible for organisations that have Assure Expenses Expedite Validation (licenced element). For more information, view Assure Expenses Expedite or contact your RLDatix Account Manager.

Note: The Custom Validation Rules are read-only and describe any additional validation checks configured by RLDatix.
- Click Save to confirm or Cancel to discard any changes made and return to the Expense Items page.
Fuel Card Mileage
- Within the Calculation section, from the Item Type drop-down list, select Fuel Card Mileage.

- Complete the following fields, as required:
Field Description Reimbursable Items From the drop-down list, select a reimbursable expense item to allow the employee to claim back personal miles when adding the fuel card mileage expense item. Force Vehicle Journey Rate Category If required, select a vehicle journey rate that must be used when adding this expense. Any claimant selected vehicle journey rates will be overridden for this expense.
For more information on creating vehicle journey rate categories, view Manage Vehicle Journey Rate Categories. - (Optional) Within the Split Expense Items section, click Add Split Item to display a window that allows you to select additional expense items to add in order to break out the cost incurred on the expense item. For more information, view Create a Split Expense Item.

- (Optional) Within the VAT Details section, click Add VAT Range to display a window which allows you to set the VAT details for the expense item. For more information, view Configure VAT on an Expense Item.

- Within the Additional Fields tab, select the check boxes of any extra fields you wish to display on the Add Expense page when an employee claims the allowance.

- Within the Roles & Limits tab, enter a Start and End date of when the allowance can be claimed and click Add Item Role to add the allowance to specific Item Roles.

- (Optional) Within the Validation tab, select the 'Validate this expense type' check box to ensure that when the expense item is claimed it will be validated via the Assure Expenses Expedite Validation service (licenced element).
Note: The Validation tab will only be visible for organisations that have Assure Expenses Expedite Validation (licenced element). For more information, view Assure Expenses Expedite or contact your RLDatix Account Manager.

Note: The Custom Validation Rules are read-only and describe any additional validation checks configured by RLDatix.
- Click Save to confirm or Cancel to discard any changes made and return to the Expense Items page.
Meal
- From the Calculation drop-down list, select Meal.
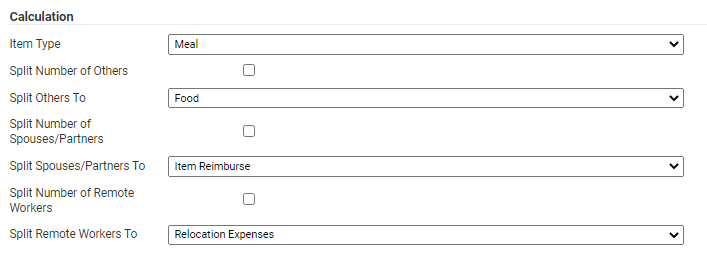
- (Optional) Add split fields for Others, Spouses/Partners or Remote Workers. Splitting a meal expense item based on attendees ensures the cost is apportioned into the relevant cost codes and VAT calculations are applied correctly. Select the check box of the required split field and choose an expense item from the drop-down list to apportion part of the cost to a separate expense item.
- (Optional) Within the VAT Details section, click Add VAT Range to display a window which allows you to set the VAT details for the expense item. For more information, view Configure VAT on an Expense Item.

- Within the Additional Fields tab, select the check boxes of any extra fields you wish to display on the Add Expense page when an employee claims the allowance.

- Within the Roles & Limits tab, enter a Start and End date of when the allowance can be claimed and click Add Item Role to add the allowance to specific Item Roles.

- (Optional) Within the Validation tab, select the 'Validate this expense type' check box to ensure that when the expense item is claimed it will be validated via the Assure Expenses Expedite Validation service (licenced element).
Note: The Validation tab will only be visible for organisations that have Assure Expenses Expedite Validation (licenced element). For more information, view Assure Expenses Expedite or contact your RLDatix Account Manager.

Note: The Custom Validation Rules are read-only and describe any additional validation checks configured by RLDatix.
- Click Save to confirm or Cancel to discard any changes made and return to the Expense Items page.
Mileage (Pence Per Mile)
- From the Calculation drop-down list, select Mileage (Pence Per Mile).

- Configure the following options as required:
Field Description Force Vehicle Journey Rate Category Select a vehicle journey rate that must be used when adding the expense to a claim. If selected, any claimant vehicle journey rate will be overridden for this expense.
For more information on creating vehicle journey rate categories, view Manage Vehicle Journey Rate Categories.Increase vehicle journey rate for passengers Select to increase the pence per mile reimbursement if additional passengers are claimed for when adding the expense.
Note: The reimbursement will increase by the amount defined within the selected vehicle journey rate category.Enable Relocation Mileage Select to allow employees to claim for excess mileage when they have been relocated and their new commute distance has increased.
For more information on setting up excess mileage expense item, view Excess Mileage.Increase vehicle journey rate for heavy bulky equipment Select to increase the pence per mile reimbursement if heavy and bulky equipment is claimed when adding the expense.
Note: The reimbursement will increase by the amount defined within the vehicle journey rate applied. - (Optional) Within the 'Fixed Mileage Deduction' section, select the 'Force Fixed Mileage Deduction' check box to display the relevant fields for configuring a fixed mileage deduction item. For more information, view Configure Fixed Mileage Deduction.

- (Optional) Within the Home to Office Mileage section, select the Enable Home to Office Mileage check box to display a list of all of the available Home to Office deduction rules which you can apply to this mileage expense item. For more information, view Configure Home to Office Mileage Calculations.

- (Optional) Within the Duty of Care section, select the Enable duty of care check box in order to enable driver document validation. The documents to be validated can be specified within General Options.

Note: Within General Options, at least one document must be selected as required in order to enable Duty of Care on an expense item.
- (Optional) Within the Split Expense Items section, click Add Split Item to display a window that allows you to select additional expense items to add in order to break out the cost incurred on the expense item. For more information, view Create a Split Expense Item.

- (Optional) Within the VAT Details section, click Add VAT Range to display a window which allows you to set the VAT details for the expense item. For more information, view Configure VAT on an Expense Item.

- Within the Additional Fields tab, select the check boxes of any extra fields you wish to display on the Add Expense page when an employee claims the allowance.

- Within the Roles & Limits tab, enter a Start and End date of when the allowance can be claimed and click Add Item Role to add the allowance to specific Item Roles.

- (Optional) Within the Validation tab, select the 'Validate this expense type' check box to ensure that when the expense item is claimed it will be validated via the Assure Expenses Expedite Validation service (licenced element).
Note: The Validation tab will only be visible for organisations that have Assure Expenses Expedite Validation (licenced element). For more information, view Assure Expenses Expedite or contact your RLDatix Account Manager.

Note: The Custom Validation Rules are read-only and describe any additional validation checks configured by RLDatix.
- Click Save to confirm or Cancel to discard any changes made and return to the Expense Items page.
Standard Item
- From the Calculation drop-down list, select Standard Item.

- (Optional) Within the Split Expense Items section, click Add Split Item to display a window that allows you to select additional expense items to add in order to break out the cost incurred on the expense item. For more information, view Create a Split Expense Item.

- (Optional) Within the VAT Details section, click Add VAT Range to display a window which allows you to set the VAT details for the expense item. For more information, view Configure VAT on an Expense Item.

- Within the Additional Fields tab, select the check boxes of any extra fields you wish to display on the Add Expense page when an employee claims the allowance.

- Within the Roles & Limits tab, enter a Start and End date of when the allowance can be claimed and click Add Item Role to add the allowance to specific Item Roles.

- (Optional) Within the Validation tab, select the 'Validate this expense type' check box to ensure that when the expense item is claimed it will be validated via the Assure Expenses Expedite Validation service (licenced element).
Note: The Validation tab will only be visible for organisations that have Assure Expenses Expedite Validation (licenced element). For more information, view Assure Expenses Expedite or contact your RLDatix Account Manager.

Note: The Custom Validation Rules are read-only and describe any additional validation checks configured by RLDatix.
- Click Save to confirm or Cancel to discard any changes made and return to the Expense Items page.


