Permissions
You will require the following permissions:
- The relevant item role that allows you to claim these expense types.
General Details
Note: You may be able to complete extra fields which are not included as part of this guide. The fields have been configured specifically by your organisation and if you require guidance with them, contact your local administrator.
- Navigate from the Home page to My Claims | Current Claims. Within the Current Claims page, you will see a list of your claims which have yet to be submitted.

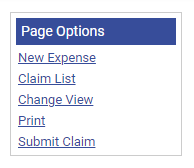
- Click on a current claim you would like to add an expense to and click New Expense. This will open the Add Expense page.
- The Add Expense page will allow you to record the specific details of the expense you have incurred. Begin by completing the General Details of the expense:
Field Description Date Enter the date that the expense was incurred. Claim The Claim field will default to the claim that you have navigated through to get to the Add Expense page. You can click the Claim field to add this expense to another current claim, if applicable. Organisation Specify the organisation that the expense was incurred for. For example, if you are adding a parking ticket expense for visiting a customer, enter the name of the company that you visited.
Click in the Organisation field and type the organisation that you want to add. If the organisation you have typed is not present within your system, a pop-up will appear asking you if you'd like to save. Alternatively, click the magnifying glass to search all existing saved organisations within your system.Reason Select the reason for incurring the expense by clicking on an option from the list of available reasons. Country Select the country that the expense was incurred in. This will default to the Primary Country set within your employee record. Currency Select the currency that was used to pay for the expense. This will default to the Primary Currency set within your employee record.
If you select another currency, the exchange rate will display against your Primary Currency. Your system configuration will determine whether or not you can edit this exchange rate.Department If required, select a department to assign the expense to. Cost Code If required, search for a cost code to assign the expense to. Project Code If required, select a project code to assign the expense to. Other Details Provide any other details such as a brief explanation of the claim. - Each expense that you are permitted to claim for is available under the My Expense Items sidebar. Select the check box next to each expense that you wish to reclaim.

Note: If you add several expenses at once, the General Details entered will be saved against each of those expenses.
- Once you have selected an expense, the page will display the Specific Details related to that expense.
The tabs at the top of this article will provide you will more detail about how to input different types of expense such as Mileage, Meals and Hotels.
Mileage
The Address+ service level which is used by your organisation will determine the level of detail which you can search by and the address details which are displayed. For more information on this view Address+ Service Level Options.
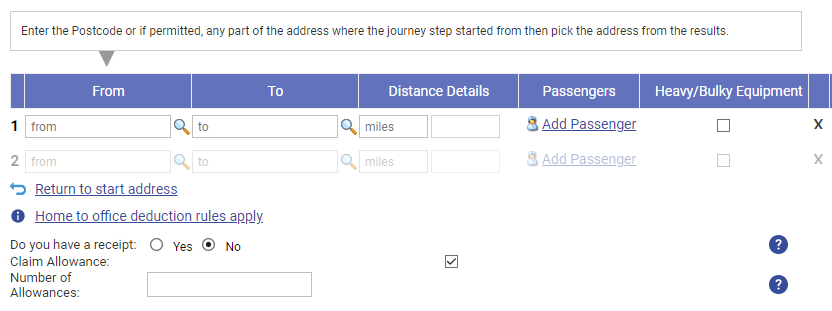
- Select a mileage related expense from the My Expense Items list. Upon selecting the mileage expense, a journey grid will appear below the General Details section.
- Select the vehicle used for this journey from the drop-down list. If you do not have an active vehicle or need to add another vehicle, click Add New Vehicle. For more information on how to add a vehicle, view Add My Vehicle. You must select the correct vehicle for this journey as it may affect the rate you are entitled to be reimbursed.
Note: The option to add new vehicle may not be available depending on your organisation's setup.
You may also need to set up relevant documentation for your vehicle, depending on your organisation's setup. For more information, visit Add Vehicle Documentation. - Click the drop-down list next to the vehicle to select the vehicle journey rate. Hovering over the drop down will show a tooltip displaying details of the vehicle journey rate.

- Click in the From field, within the journey grid, to begin searching for the location where the journey began.
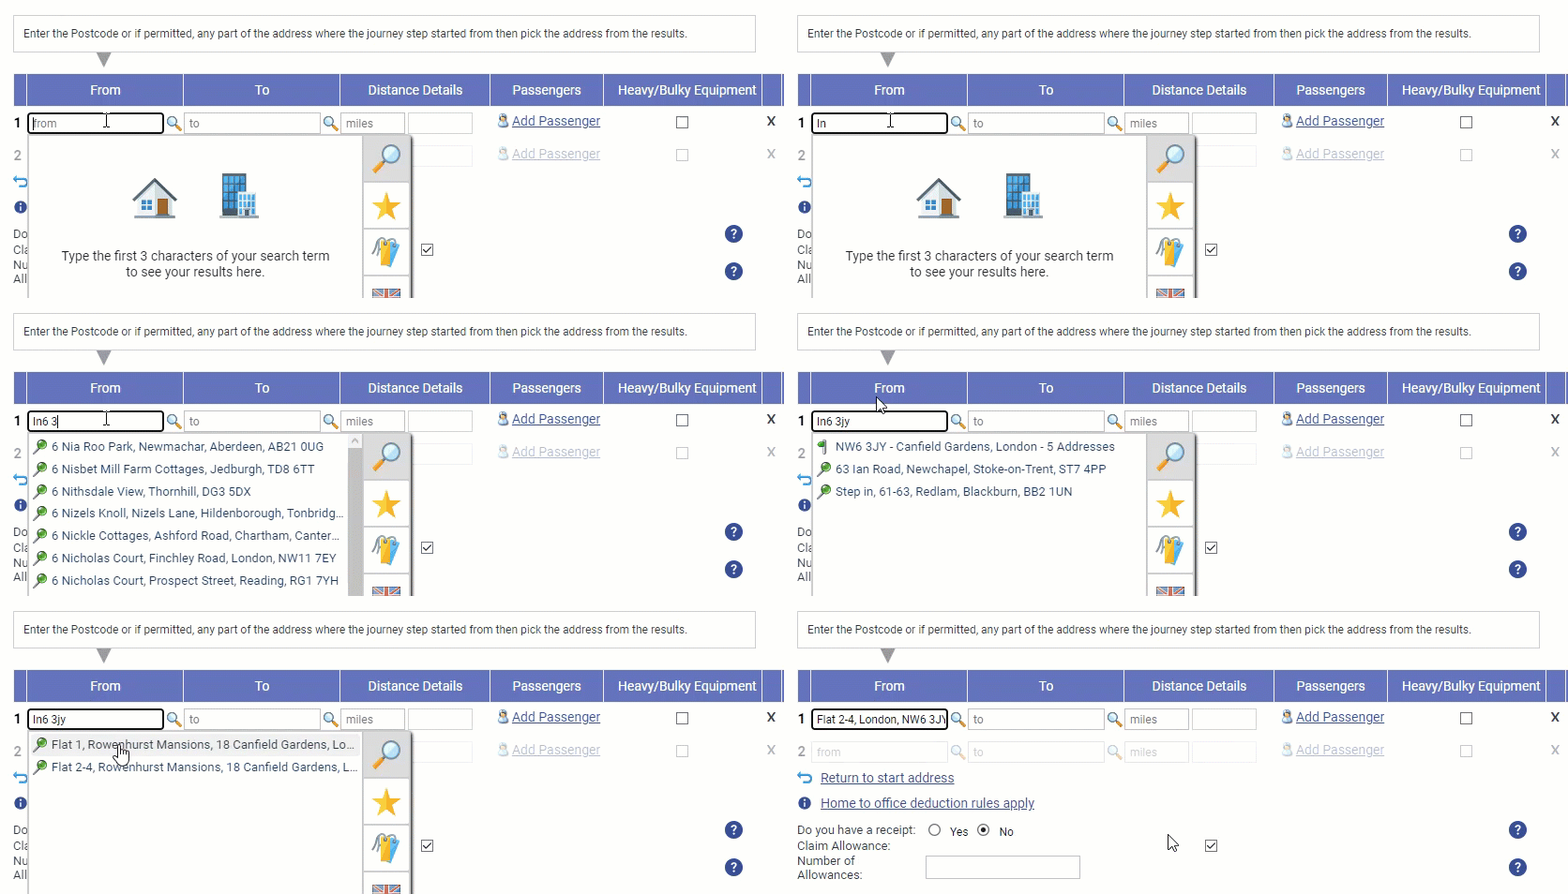
Feature Description Addresses Search for a location using a postcode or address details and the address widget will display a list of relevant addresses, favourites and labels.
Once you have found the correct location, click to add it as your journey start address.
Note: For a description of all the different types of icons that may be displayed, view Adding a journey - Glossary of Icons.
If you are unable to find the location you are looking for, you may be permitted to add a Manual Address. If displayed, click the Can't find what you're looking for? link and you will be directed to a form where you can enter the address details. Click Save to store the address for future use.Favourites Filter your search results to only display relevant personal and account wide favourites.
To add a new favourite, hover over a search result and click the icon.
icon.Labels Filter your search results to only display relevant personal and account wide labels.
To add a new label, hover over a search result and click the icon.
icon.Country Click the flag icon to select a different country from the list of available countries. This will default to your 'Primary Country', if configured, otherwise it will display the 'Default Country' set by your organisation. Home & Office - Click the
 icon to automatically populate your home address which has been set within your employee record.
 - Click the
 icon to automatically populate your office address which has been set within your employee record.
Upon clicking in the From or To field, the Home and Office icons will appear as large icons in the centre of the address widget and smaller icons in the bottom left of the window. Once you begin to type in a postcode or address, a list of relevant addresses will be displayed and only the smaller Home and Office icons will be available to select.
Note: This will populate the correct address, set within your employee record, based upon the date of the expense.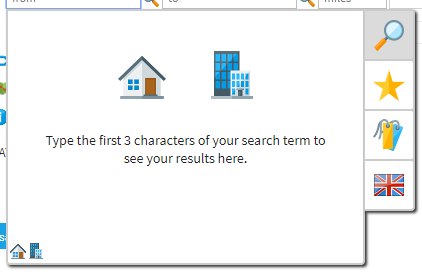
- Click the
- Click in the To field to begin searching for the next journey destination. Follow the process above to search for and select a new location.
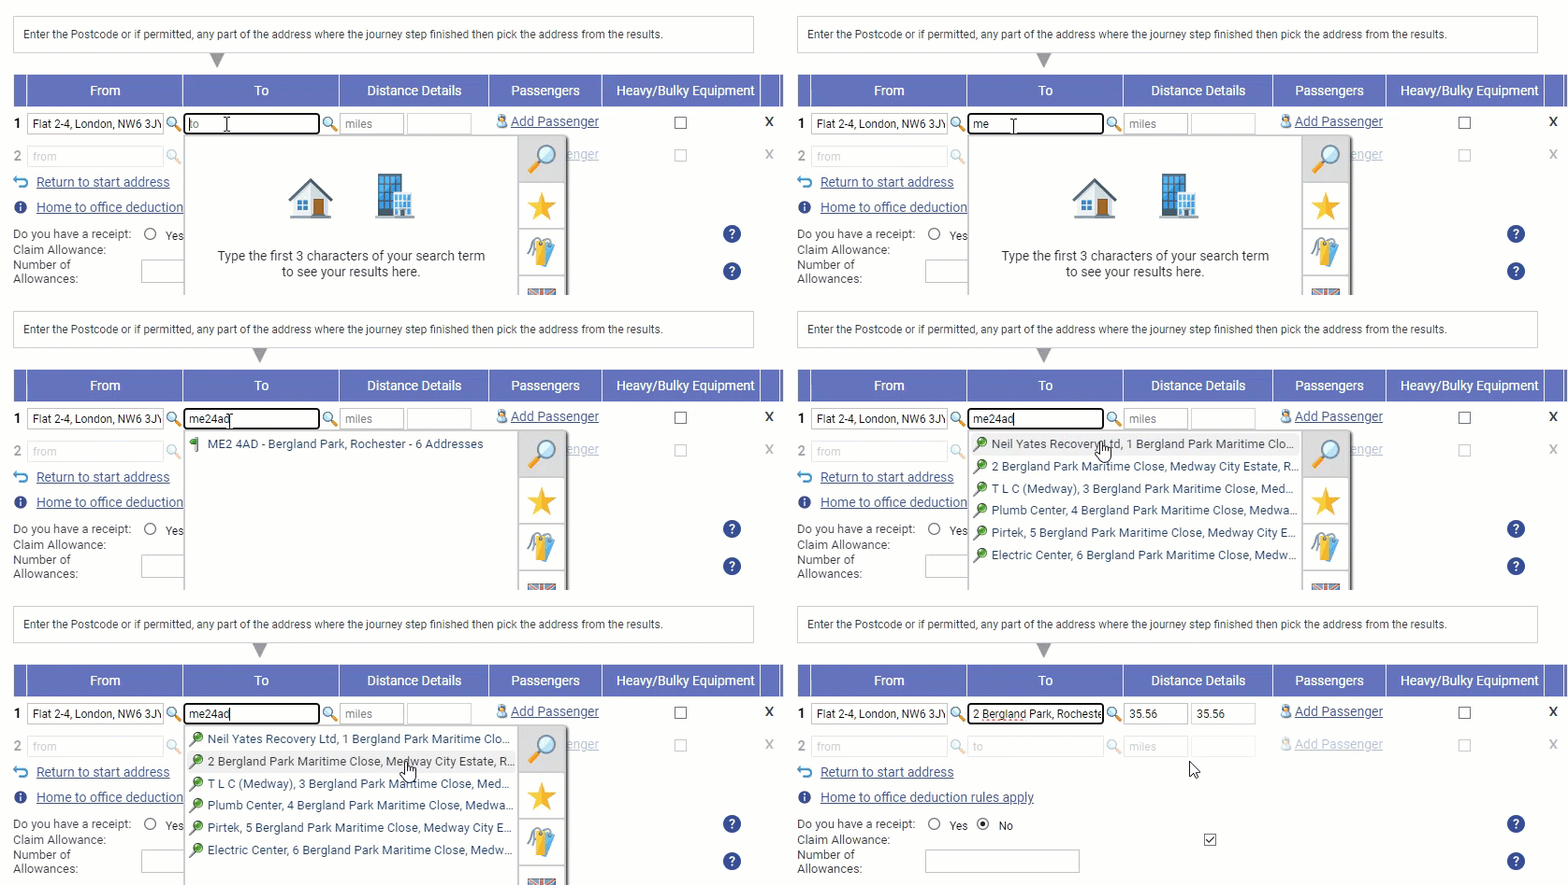
- Upon completing the From and To fields, Distance Details will automatically populate with the recommended distance between both locations. If your system settings permit; this figure may be overwritten by entering the actual mileage in the box to the left.
- Below is a list of additional features that may be available depending on your system setup.
Features Descriptions Passenger You may be able to enter passengers who were travelling with you on that specific journey step; this is required if you receive a higher rate of reimbursement for vehicle sharing. Depending on your system setup, you can add passengers using the following methods: - Name of Passengers - Click the Add Passenger link and then search for the Assure Expenses user who was a passenger on this step of the journey. Click the user to add them as a passenger. You can then repeat this process for each passenger present on this step of the journey.
- Number of Passengers - Enter the number of passengers who were present on this step of the journey (not including the driver).
Adding Additional Journey Steps An empty journey step will always appear under your last, giving you the option to add further locations to your journey. Follow the same process as described above to add additional journey steps. To delete a journey step, click the  icon at the end of that particular step.
Return to Start Address Click this option to create a journey step that returns to your original location from your last entered location. Heavy/Bulky Equipment You may be able to tick the Heavy/Bulky Equipment checkbox. Click this option if you transported heavy or bulky equipment during the journey step. This will calculate the amount reimbursed based upon the journey steps it has been selected against. Map and Route If your organisation has Route+ activated, you will see the View the recommended route and directions on a map option. This will show you a map of the route that has been calculated along with a list of directions. Click on the link and the route and map will open in a new window. Click the close button at the bottom of the window to close the map and return to the expense item screen.
- Upon completing the From and To fields, Distance Details will automatically populate with the recommended distance between both locations. If your system settings permit; this figure may be overwritten by entering the actual mileage in the box to the left.
- After adding any additional options or features, to complete your Journey click the Save button to add the mileage expense to your claim. Alternatively, click Cancel to discard the unsaved changes and return to the Claim Details page.
Meal
- Select a meal related expense from the My Expense Items list. Upon selecting the meal expense, the relevant fields will automatically be displayed below the General Details section.
Tip: Common meal expense items are usually considered as Breakfast, Lunch and Evening Meal.
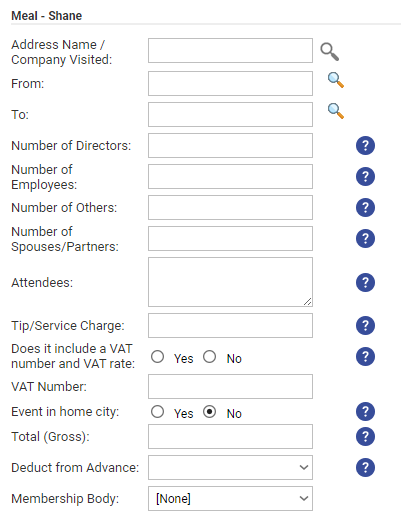
- Complete the following fields for the meal expense. Based upon the meal expense you have selected, required fields may include, but are not limited to the following:
Fields Description Number of Employees Enter the number of employees that were present. This can impact the VAT portion of the expense item. Number of Others Enter the number of other people present, excluding directors and other staff. For example, if you are entertaining a client, enter the number of people present from the client's organisation. This can impact the VAT portion of the expense item. Number of Directors Enter the number of directors that were present. This can impact the VAT portion of the expense item. Number of Spouses/Partners Enter the number of spouses or partners that were present. This can impact the VAT portion of the expense item. Number of Remote Workers If you have multiple sites and host an event, a remote worker is defined as a member of staff that does not work at the hosting site. This can impact the VAT portion of the expense item. Event in a Home City Selecting Yes may alter the amount of VAT that your organisation can reclaim. Only select 'Yes' if the event was within a 5 mile radius of your place of work. Attendees Enter the names of each of the attendees. For example, if you took a client to a networking lunch, list the names of all employees who were in attendance, including the client's employees. Tip/Service Charge If you have given a tip or have incurred a service charge, provide the amount in this field.
Note: When entering the Total (Gross) for this expense, ensure that it is inclusive of the tip. - Complete any further fields which are present in the Item Details section:
Field Description Do you have a receipt Select whether you have a receipt to attach to the meal expense. Does it include a VAT number and VAT rate Select whether the receipt includes a valid VAT Number and VAT Rate.
Note: This field only becomes active if you have selected yes for the Do you have a receipt field.VAT Number Enter the VAT Number which is present on the receipt. Total (Gross) Enter the total amount for the meal expense.
Note: Ensure that this figure is inclusive of the tip, if applicable.Deduct from Advance If available, select the advance which was used for the purchase.
Note: This will only show advances where the advance currency matches the currency selected for the expense. Can only be used when Cash/Personal Credit Card is selected as the Payment Method.Bank Account Click the Bank Account field which will direct you to the Select Account page. This will allow you to select the appropriate bank account from your existing accounts within Assure Expenses. When submitted, the approver will not be able to see details of your selected bank account.
Note: The Bank Account field will only display for users who have more than one registered bank account. This field will be mandatory if your Access Role includes the "Employee must have at least one bank account to claim expenses" option.
Note: If you do not have a bank account registered within Assure Expenses but have an Access Role which includes the "Employee must have at least one bank account to claim expenses" option, you will be presented with an notification which prompts you to create a bank account.Payment Method Select the method used to pay for the expense. You will only be able to select payment methods which are configured within your employee record.
Note: This field will only appear for applicable expense items. - When you have confirmed that all of the details are correct, click Save to add the meal expense to your claim and return to the Claim Details page.
Hotel
- Select a hotel related expense from the My Expense Items list. Upon selecting the hotel expense, the relevant fields will automatically be displayed below the General Details section.
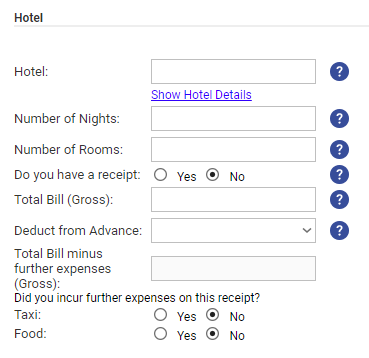
- Complete all the following fields for the hotel expense, as described below:
Field Description Hotel Begin entering the characters of the hotel into the 'Hotel' field. This will generate a list of hotels matching those characters from which you can select the correct hotel. Selecting the 'Show Hotel Details' link allows you to view the address details to ensure it is the correct hotel.
If the hotel does not appear in the list you can add it to the system manually by clicking 'Show Hotel Details', enter the full address of the hotel and then click Save.Number of Nights Enter the number of nights you stayed at the hotel. Number of Rooms Enter the number of rooms you paid for. Do you have a receipt Select 'Yes' or 'No' depending upon whether you have a receipt, invoice or bill for the hotel. Does it include a VAT number and VAT rate Select 'Yes' or 'No' if the payment receipt includes VAT information; it must show both a VAT number and either a VAT amount or VAT rate in order for you to correctly select 'Yes'. Total Bill (Gross) Enter the full amount paid, including additional split expenses such as meals or drinks. Total Bill minus further expenses (Gross) This field will be populated based upon the 'Total (Gross)' less any further expenses which have been incurred at the hotel. This will update for each split expense that you add in the further expenses section below. Did you incur further expenses on this receipt? If you have incurred further expenses during the hotel stay, select 'Yes' against each expense. Complete the fields which are displayed for each split expense. The total for each split expense will affect the 'Total Bill minus further expenses (Gross)' field. 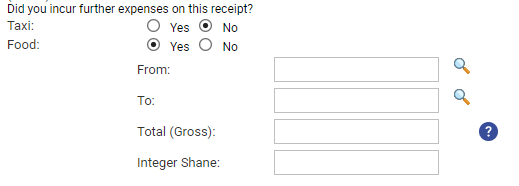
- When you have confirmed that all of the details are correct, click Save to add the hotel expense to your claim. This will return you to the Claim Details page which will show the hotel as a single expense, however, the
indicates that the expense includes split items.
Daily Allowance
- Select a Daily Allowance related expense from the My Expense Items list. The relevant fields will automatically be displayed below the General Details section.

- Complete the following fields as described below:
Fields Description Allowance Click on the Allowance drop-down list to display the available allowances and then click the allowance which you want to claim for.
In our example above, this is where you would select the "Food Allowance". The allowances available to claim will vary between different organisations and will contain different allowance rates and allowance hour thresholds.Start Date/Time Enter the Date and Time that the allowance started. End Date/Time Enter the Date and Time that the allowance ended. Deduct Amount If an amount needs to be deducted from the allowance, enter the amount into the Deduct Amount field.
In our example, this field might be used if some of your food allowance was claimed on a lunch expense instead. Where you would usually claim £10 on a food allowance, £6 was spent on lunch and claimed using a lunch expense item, so you would be required enter £6 into the deduct amount, therefore you are only claiming the remaining £4 which you are entitled to. - When you have confirmed that all of the details are correct, click Save to add the Daily Allowance expense to your claim and return to the Claim Details page.
Fixed Allowance
A Fixed Allowance is an expense item where the amount is predetermined and as a claimant you enter the amount of this allowance that you want to claim. For example, your organisation may have a Subsistence Fixed Allowance set at £4. During the month, you incur this expense four times. When entering your monthly claim, you only need to specify the Number of Allowances which you incurred and Assure Expenses will automatically calculate the reimbursement (£4 x 4).
- Select a Fixed Allowance related expense from the My Expense Items list. The relevant fields will automatically be displayed below the General Details section.
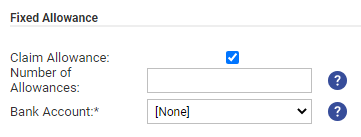
- Select the Claim Allowance check box and then enter the number of times you claimed this allowance into the Number of Allowances field.
- Complete any additional fields which may be required to add the expense to your claim.
- When you have confirmed that all of the details are correct, click Save to add the Fixed Allowance expense to your claim and return to the Claim Details page.


 icon.
icon. icon.
icon. icon to automatically populate your home address which has been set within your employee record.
 icon to automatically populate your office address which has been set within your employee record.

 icon at the end of that particular step.


 indicates that the expense includes split items.

