Edit a Failed Validation Item
- After receiving notification of an expense item that has failed validation and that has been returned, you will need to navigate to My Claims | Submitted Claims and then click the claim which contains the returned expense item(s).
- Locate the returned expense item(s) under the 'Expense Items' section. Returned expense items will be highlighted in red.

- Click
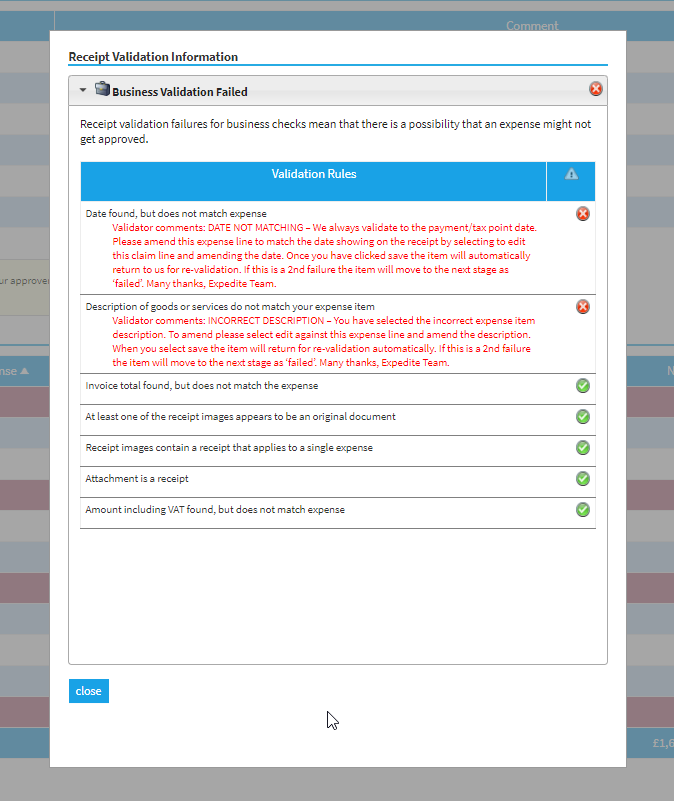
 on the returned expense item to view the validation results and the reason(s) that is has been returned to you by validation team.
- Once you have this information you can either manage the receipts, change the expense item details, dispute the returned expense items or delete the expense items.
Note: You will be required to action each returned item in order for your claim to be progressed to the next stage.
Add/Replace/Delete Receipts
- Click
 on the returned item that you want to manage the receipts for. This will display the 'Receipt Management' page where you will be able to manage the receipts for any of your returned expense items.
 - You can then do the following:
Action Description Add Receipt Click  and then select a new receipt to upload to the returned expense item.
Delete Receipt Click  to remove the receipt from the expense item.
 - Once you have finished managing the receipts, click Save. At this point, the following scenarios can occur:
- Any items which you have added or replaced receipts for will be automatically returned to the validation team for revalidation.
- If you have deleted receipts for one or more items, you will receive a prompt explaining that if you click OK, your claim will progress with those items missing receipts. If you have any outstanding returned items which you have not yet actioned, you will be returned to the Claim Details page but the claim will not yet progress automatically as you still have items which need to be actioned.
- Any items which you have added or replaced receipts for will be automatically returned to the validation team for revalidation.
Edit Expense Item Details
- Click
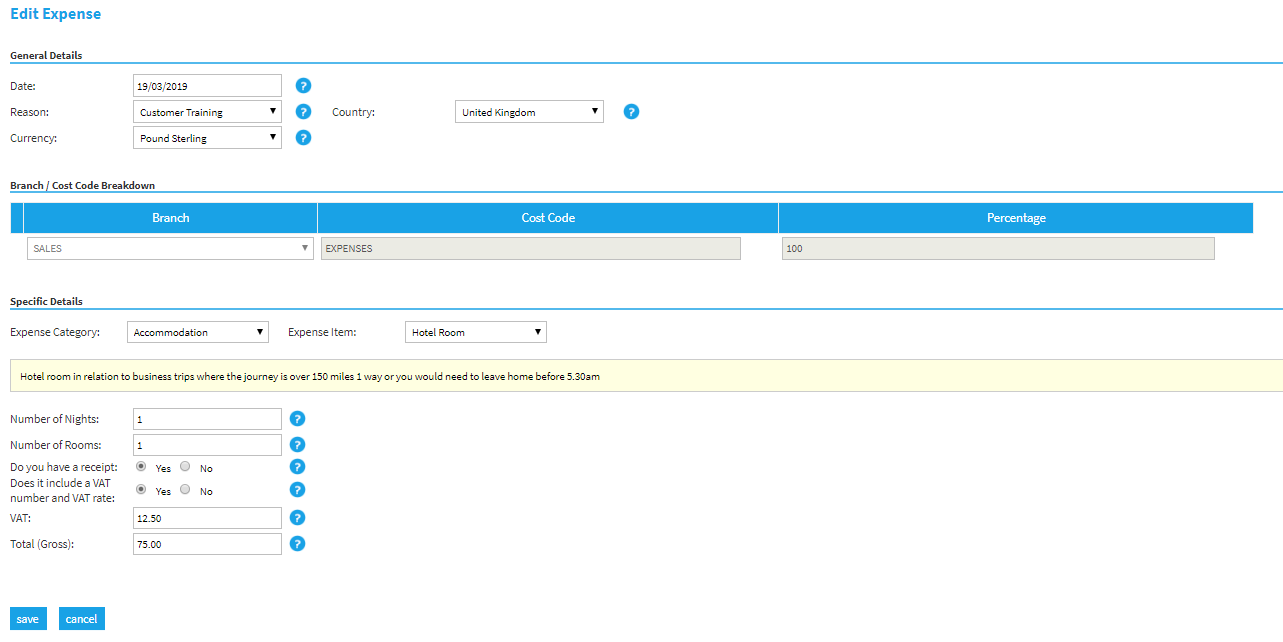
 on the returned item that you want to edit. This will display the Edit Expense page.
- Edit the details required for revalidation.
- Click Save. The expense item will then automatically be sent back to the validation team for revalidation.
Dispute Returned Expense Items
- Click
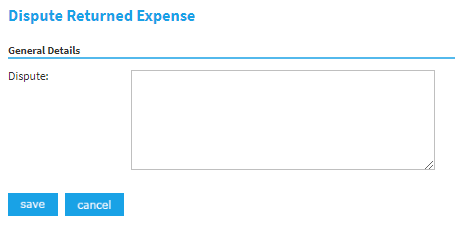
 on the returned expense item. This will display a new page where you can enter the reason for the dispute.
- Enter the reason why you are disputing the returned expense item.
- Click Save. The expense item will then automatically be sent back to the validation team for revalidation.
Delete Expense Items
- Click
 on the returned expense item. This will delete the returned expense item. If this is the last returned item to be actioned, the claim will automatically progress to the next stage.
Reasons for Failure
| Reason | Explanation |
|---|---|
| Single Receipt Per Line | Only 1 receipt accepted per expense line. Please amend by clicking ‘edit’ on this expense line and reducing the amount claimed to the value of the 1 of the receipts. The additional receipt will need to be claimed separately; to do this, reduce the amount claimed to that of a single receipt for this line and add the other items & receipts to a new claim. If this is a 2nd failure the item will move to the next stage as ‘failed’. |
| Single Expense Per Line | You cannot add multiple expense items together on 1 claim line. Please amend by clicking the edit icon on this expense line and reducing the amount claimed to just the item you would like to claim. The additional item will need to be claimed separately; to do this, reduce the amount claimed to that of a single receipt for this line and add the other items & receipts to a new claim. If this is a 2nd failure the item will move to the next stage as ‘failed’. |
| Blurred Image | The image uploaded is of poor quality and we are unable to read the information to validate it successfully. Please upload an additional image before resubmitting. To do this click on receipt management and add the image before clicking save; then use the dispute icon (yellow curved arrow) and explain that you have added a new receipt. If this is a 2nd failure the item will move to the next stage as ‘failed’. |
| Fuel Amount Only | When claiming on a fuel receipt line you must only enter the value of the fuel purchased. Even if you are not claiming the other items we can only validate the fuel amount. Please amend by clicking the edit icon and reducing the amount claimed to fuel purchase only. If this is a 2nd failure the item will move to the next stage as ‘failed’. |
| Date Not Matching | We always validate to the payment/tax point date. Please amend this expense line to match the date showing on the receipt by selecting to edit this claim line and amending the date. Once you have clicked save the item will automatically return to us for re-validation. If this is a 2nd failure the item will move to the next stage as ‘failed’. |
| Over Claiming | Based on the value of the receipt we can see, you are over claiming the value of the item claimed. Please click to edit this expense line and reduce the amount claimed to be matching or below the value shown. If this is a 2nd failure the item will move to the next stage as ‘failed’. |
| Booking Confirmation | We do not accept booking confirmations; only receipts/invoices showing full payment on a non-refundable basis. Please upload a copy of your invoice or remove from the claim until you have the correct documentation. To upload a new image please click on receipt management and add, then use the dispute icon (yellow curved arrow) and explain that you have added a new receipt. If this is a 2nd failure the item will move to the next stage as ‘failed’. |
| Incorrect Description | You have selected the incorrect expense item description. To amend please select edit against this expense line and amend the description. When you select save the item will return for re-validation automatically. If this is a 2nd failure the item will move to the next stage as ‘failed’. |
| Statement | We do not accept bank/credit card statements as an acceptable receipt/invoice. Please upload a copy of the purchase receipt/invoice by selecting receipt management and adding the image then use the dispute icon (yellow curved arrow) and explain that you have added a new receipt. If this is a 2nd failure the item will move to the next stage as ‘failed’. |
| Incorrect Expense Item Selected | Fuel receipts should be attached to expenses using the ‘Fuel Receipt’ expense item using the full amount of the fuel purchased and the date the fuel was purchased. Mileage should remain on the mileage line but do not attach a receipt to this item as it will be rejected. |
| Not A Receipt | Please upload a copy of the purchase receipt/invoice by selecting receipt management and adding the image, then use the dispute icon (yellow curved arrow) and explain that you have added a new receipt. If this is a 2nd failure the item will move to the next stage as ‘failed’. |
| Balance Due | We cannot accept a receipt/invoice that has a balance due showing. Please upload a copy of the receipt/invoice showing a zero balance, or one that shows the balance has been paid. Upload a copy by selecting receipt management and adding the image, then use the dispute icon (yellow curved arrow) and explain that you have added a new receipt. If this is a 2nd failure the item will move to the next stage as ‘failed’. |
| Toll/Journey Statement | We cannot accept toll/journey statements where multiple days have been added together. We can only accept either an individual toll/journey or a daily total. Please click to edit this expense line and reduce the amount claimed to match either an individual line or daily total; you will then need to add the additional items to a new claim. If this is a 2nd failure the item will move to the next stage as ‘failed’. |
| Corrupt Image | Unfortunately your image has become corrupt in Assure Expenses and we are unable to read it. Please upload your receipt in a different format to how you uploaded originally, and we will attempt validation again. To upload a new image please click on receipt management and add, then use the dispute icon (yellow curved arrow) and explain that you have added a new receipt. If this is a 2nd failure the item will move to the next stage as ‘failed’. |

 on the returned expense item to view the validation results and the reason(s) that is has been returned to you by validation team.
 on the returned item that you want to manage the receipts for. This will display the 'Receipt Management' page where you will be able to manage the receipts for any of your returned expense items.
 and then select a new receipt to upload to the returned expense item.
 to remove the receipt from the expense item.
 on the returned item that you want to edit. This will display the Edit Expense page.
 on the returned expense item. This will display a new page where you can enter the reason for the dispute.
